The simplest and in an accessible way execution rough coating For a room of any purpose, it is necessary to install a concrete floor on the ground. Although the procedure does not require special skills, the quality of the final floor directly depends on compliance with certain technical points related to its arrangement. We will discuss below how to make a concrete floor on the ground and how to pour a concrete floor on the ground.
Characteristics and components of a concrete floor on the ground
When installing any floor on the ground, the main thing is to ensure high-quality thermal insulation. It is precisely because of its installation that in the end it is possible to obtain a multi-layer floor, called a pie.
The production of floors on the ground directly depends on the type of soil and its characteristics. The first and most important requirement for the soil is the level at which groundwater is located, which should be at least 500-600 cm from the surface. In this way, it will be possible to avoid movement and heaving of the soil, which will be reflected on the floor. In addition, the soil should not be loose.

For more high-quality execution All work should determine the requirements for installing thermal insulation, which are as follows:
- prevention of heat loss;
- intrusion protection groundwater;
- providing sound insulation;
- prevention of vaporization;
- ensuring a comfortable and healthy indoor microclimate.
A warm concrete floor on the ground contains the following components and stages of work:
1. Cleaning the soil from the top layer. In addition, the surface is carefully leveled.
3. Then a bed of gravel or crushed stone is installed on the sand. It is this area that prevents the rise of groundwater, in addition, it additionally levels the surface. The thickness of the filler layer is about eight centimeters.
4. The next layer is the use of reinforced steel mesh. It is an excellent fixer for concrete bases. In addition, it is a place for fixation metal pipes. Reinforced mesh is not used in all cases, but only when additional reinforcement is necessary.
5. The next layer is more than 5 cm thick and is the subfloor. Concrete solution is used for its arrangement. After it gains strength within 2-3 weeks, the next layer of “pie” is installed on the surface.

6. This layer contains a special membrane or waterproofing film, which prevents the risk of absorbing excess liquid concrete base. The film is laid with an overlap; to avoid the appearance of cracks, construction tape is used to seal all joint areas.
7. The next stage is the installation of insulation, for which it is recommended to use foamed polystyrene foam or high-density polystyrene coated with foil. If there is too much load on the floor, it is better to use insulation in the form of slabs.
8. Next, waterproofing or roofing felt is installed. After which the construction of the true screed is carried out. It is on it that the final finishing coat. The thickness of this layer is from 8 to 11 cm. This screed requires mandatory reinforcement.
Concrete floor in a house on the ground: advantages and disadvantages of arrangement
Among the advantages of making a concrete floor on the ground are:
- security reliable protection bases from the effects of low temperatures, the soil on which the floor is installed always differs only in temperature above zero;
- diversity thermal insulation materials for floor insulation allows you to build a structure with good performance preventing heat loss;
- the resulting floor is finished with any of the existing floor coverings;
- no special calculations are required for the floor, since the entire load is taken by the ground covering;
- installing heated floors perfectly heats the room; in addition, they heat up quickly enough, and the heat is distributed evenly throughout the room;
- heated floors on the ground have good sound insulation characteristics;
- In addition, mold and dampness practically do not form on such a floor.

Among the disadvantages of a rough concrete floor on the ground are:
- when using a multi-layer floor, the height of the rooms is significantly reduced;
- if problems occur, dismantling work will require a lot of material resources;
- arranging a floor on the ground requires a large investment of material, physical and time resources;
- If the groundwater is too high or the soil is very loose, it is not possible to install such a floor.

Construction of a concrete floor on the ground: selection of materials
As mentioned earlier, to install a concrete floor on the ground you will need to build multilayer construction. It is recommended to use as the first layer river sand, then crushed stone or expanded clay.
After their installation, the rough screed is installed, waterproofing film and thermal insulation. Next, a finishing screed is installed, which is the basis for laying finishing materials.
The main function of sand and crushed stone is to protect the room from moisture penetration. When using crushed stone, it must be thoroughly compacted, and the crushed stone must be treated with bitumen.
If the soil is too wet, the use of expanded clay is unacceptable. Because it absorbs excess moisture and then changes its shape. After covering the layer with a polyethylene-based film, a rough screed is poured in a layer of about eight centimeters. Next, waterproofing is installed on it from two polyethylene layers laid overlapping. Please note that the polyethylene must be very tightly connected to each other to prevent moisture from entering the room.

- extruded polystyrene foam;
- mineral wool;
- foam glass;
- polystyrene foam, etc.
After this, the finishing screed is arranged, which mandatory reinforced. To ensure the evenness of the screed, it is recommended to use beacons.

Concrete floor on the ground manufacturing technology
The construction of the floor should begin only after the walls and roof have already been erected. The procedure for making a concrete pavement on the ground includes the following steps:
- carrying out work to determine the height of the floor and marking it;
- cleaning the top layer of soil and compacting the base;
- installation of gravel or crushed stone;
- hydro- and thermal insulation works;
- strengthening concrete screed;
- installation of formwork for pouring mortar;
- direct filling.

The ground floor is built so that it is flush with the doorway. Markings should be applied around the perimeter of the building. To do this, marks are placed on the walls at a distance of 100 cm from the bottom of the opening. When the marking is completed, you should lower it back one meter. This line will become a guide for pouring concrete. To make marking easier, you should install pegs in the corner parts of the room on which the ropes are tensioned.
The next stage of work involves clearing the base from the top layer of soil. First you need to get rid of any debris on the floor. Gradually remove all of the top soil. The concrete floor on the ground has the appearance of a structure, up to 35 cm thick. Therefore, the soil that is removed from the surface must be exactly this thickness.
Using special equipment, such as a vibrating plate, the surface is compacted. If it is not available, it is enough to use wooden log, with handles previously nailed to it. The resulting base should be even and dense. There should be no marks left on it while walking.
If the soil is located lower than the doorway, only the upper part is removed, the surface is compacted well, and then covered with sand.
Next, work is carried out on the installation of gravel and crushed stone. After compacting the base layer, gravel is backfilled; the thickness of this layer is about 10 cm. Tip: After filling, the surface is watered and compacted again. To simplify control over the evenness of the surface, it is necessary to drive pegs into the ground, set in relation to the level.
After the gravel layer, leveling is done with sand. The layer should have the same thickness, about 10 cm. In order to control the evenness of the surface, use the same pegs. To construct this layer, it is recommended to use ravine sand, which has various impurities.

Crushed stone is laid on the sand, with a fraction of 4x5 cm. Next, it is compacted, and the surface is sprinkled with sand, leveled and compacted. Lay the crushed stone in such a way as to avoid the appearance of protruding edges on the surface.
Please note that each of the layers laid on the floor must first be checked for horizontalness. Therefore, during the work, use a building level.
Thermal and waterproofing of concrete floors on the ground
To create a waterproofing layer, it is enough to apply polyethylene film or membranes. Waterproofing material should be rolled out along the entire perimeter of the floor, try to bring its extreme sections a few centimeters beyond the zero markings. The sheets are overlapped and fixed to the surface with tape.
In order to improve the thermal insulation of the floor and prevent the ground from freezing, it is recommended to treat the floor with mineral wool.
Features of reinforcing a concrete floor on the ground
In order for concrete to acquire the required strength, it must be reinforced. To perform this process, it is recommended to use a metal or plastic mesh, reinforcement bars or reinforcing wire.
To install the reinforcing frame, special stands should be equipped, the height of which is about 2.5 cm. Thus, they will be located directly on the concrete floor.
Please note that using a plastic mesh involves stretching it over previously hammered pegs. When using wire, the manufacture of a reinforcing frame will require welding and skill in working with it.
In order for the pouring procedure to go quickly and the result to be of high quality, the guides should be installed and the formwork mounted. Divide the room into several equal sections, the width of which is no more than 200 cm. Install guides in the form of wooden blocks, the height of which is equal to the distance from the floor to the zero mark.
To fix the guides, use thick cement, clay or sand mortar. Formwork is installed between the guides, which forms cards filled with concrete mortar. It is recommended to use moisture-resistant plywood or wooden boards as formwork.

Please note that the guides and formwork are brought to zero and aligned with the horizontal surface. In this way, it will be possible to obtain a base that is even. Before installing the guides and formwork, they should be treated with a special oil, which will facilitate the procedure of pulling them out of the concrete mixture.
Technology of pouring a concrete floor on the ground
Filling is carried out once or maximum twice. Thus, it will be possible to build a homogeneous and powerful structure. In order for the concrete floor on the ground to serve its owners with their own hands for a long time, it is best to order a special concrete solution from the factory. Its strength and quality are much higher than those prepared at home.
To make your own solution, you will need a concrete mixer, cement grade of at least 400, river sand and filler in the form of crushed stone.
In order to prepare a concrete solution, you should mix one part of cement, two parts of sand and four parts of filler, and, based on the total amount of ingredients, half of the part of water will be required.
All ingredients are mixed in a concrete mixer, make sure that all ingredients are mixed well together. Start pouring the floor from an area opposite to the entrance to the room. Fill three or four cards at once, and then use a shovel to level the composition over the entire surface.
To ensure good adhesion of concrete to the surface, it is recommended to use a hand-held concrete vibrator.
After most of the cards are filled, it is necessary to perform a rough leveling of the surface. For these purposes, you will need a rule two meters wide, which stretches smoothly across the floor. This rule will help get rid of excess concrete that ends up in empty cards. After leveling, remove the formwork and fill the remaining areas with mortar.
After leveling the entire floor area, cover the floor with polyethylene film and leave for a month. Please note that after several days, the surface is constantly moistened with water to avoid drying out of the concrete, the formation of cracks and looseness of the base.

The final stage involves treating the floor using mixtures on a self-leveling basis, which are used to equip the screed. It is the mixture that will help make the base perfectly smooth and eliminate minor surface irregularities.
Work also begins from the corner opposite the door; it is recommended to use a shovel to apply the solution, and a rule to level the base.
The floor is left to settle for 72 hours. Next, the floor is ready for laying finishing materials for flooring. It is this type of concrete floors on the ground in a private house that will provide a strong and durable foundation.
Concrete floors on the ground video:
A private house– this is a place where owners strive to create their own personal nest. Here everything will be done with your own hands, with love. Therefore, you should approach the choice of flooring materials responsibly.
Pouring the floor with concrete is an ideal option for rough covering. But in order to concrete covering served for a long time, you need to know the filling technology. This is exactly what this article will be about.

Design Features
Concrete pavement has a long service life. IN Lately owners of private houses are increasingly installing just such a floor. It can also be poured in a bathhouse or sauna. This is due to its many advantages. Below is a list of all the advantages of concrete pouring:
- Withstands high loads;
- If all concreting rules are followed, the floor will last for several decades;
- Good thermal insulation performance - heat loss from the room is reduced to zero when maximum thickness screeds and optimal layer insulation;
- You can lay any covering on a concrete floor (tiles, parquet board, laminate, etc.);
- Can be combined with heated floors;
- There is no risk of mold and mildew.


When enough large quantities Concrete coating also has advantages and disadvantages:
- Heavy weight - if a concrete floor is laid on floors, then they must have increased strength to cope with the load;
- The work requires a certain skill, so it would be better to have a specialist handle the screed.
- High cost of material;
- It takes several weeks for a concrete floor to dry completely.

Still, it is worth considering that a concrete floor is the most best option for the floor in a private house.
Tools and materials
Before you start pouring a concrete floor, you need to know what tools will be needed during the work process:
- Concrete mixer. Necessary in order to prepare a high-quality and homogeneous solution. Of course, if the amount of work is small, then you can cope without it. But the presence of this device guarantees a homogeneous, well-mixed solution. Accordingly, the coating after pouring will delight you with its appearance and quality.
- Shovel. There's nowhere without her. This tool will be useful at the preparation stage - leveling sand and soil, digging a pit for the floor on the first floor. It is needed for moving all bulk materials, as well as loading concrete mortar.
- Various containers(buckets, containers). Necessary for transporting concrete, as well as for storing it. Ideal option will metal molds. They will not be used in the future and can simply be disposed of, because the concrete solution cannot always be washed.


- Rammer– soil compactor to create a durable cushion under the concrete surface. Well-compacted layers of soil, sand, crushed stone, and expanded clay will serve as high-quality support for a concrete floor.
- Level. Simply indispensable for preparing and arranging a flat floor in a private home. Useful for initial stage in order to make a perfectly level mark along the height of the floor. It will also be needed when installing formwork.
- Rule. Necessary for leveling newly poured screed. Eliminates the possibility of grooves and irregularities.


- Trowel. Used for working in small areas.
- Needle roller necessary to eliminate air bubbles in uncured concrete pouring. When leveling the concrete solution, air can penetrate and remain in the coating. Because of this, microcracks may soon appear, which will shorten the service life of the concrete coating. Walking with a roller fresh concrete, you will get rid of the problem of air bubbles.
- Wire brush for cleaning hardened concrete. It will help to avoid the formation of roughness on the finished coating.


Concreting process
Floor installation begins only after the installation of load-bearing and additional walls, and also made a roof. This applies to both residential and non-residential premises. In order to pour a concrete floor with your own hands, the work should be done in several stages.
Taking measurements
Measurements are necessary in order to determine the zero floor level. Typically this parameter coincides with the level of the foundation. Everything below is considered to be the subfloor. If the house is being built according to the project, then all measurements will be reflected in the drawings.
Next, the thickness of each layer of the “pie” is calculated. The layer of sand should be 10-15 cm. In private houses, an additional layer of gravel may not be used, since the load on the concrete surface is low. The next layer is a rough layer, approximately 10 cm thick. You can use reinforced mesh. The thickness of the insulation should be 10 cm. And last layer- concrete screed. Layer thickness – at least 7 cm for residential premises. All of the above layers are summed up and a value equal to the thickness of the “pie” from the ground to zero level floor.


Cleaning and compacting the soil
The soil is cleared of excess debris. Depending on the calculations, excess soil must be removed. If there is not enough soil, then add more. The work is carried out manually, as large equipment can damage the foundation. The next step is to compact the soil.
Get the job done better with special tools, this way you will save time and the work will be done better.

Backfilling with gravel or crushed stone
Before starting to fill the sand inside Marks are made along the height of the layers and lines are drawn. Deviations of no more than 2 cm are allowed. The sand is laid in layers and carefully compacted. The better the sand compaction, the more stable the floor will be. For this it is better to use professional equipment.


Rough concrete floor
A rough concrete floor is necessary in order to improve the performance properties of the base concrete coating. For strength it is necessary to install reinforcement. It is worth pouring the solution in portions, focusing on previously determined layer levels and marks. Concrete must be leveled using a long rule.
To avoid unevenness, use a level.


Hydro- and thermal insulation
To install waterproofing on concrete, it is enough to wait 48 hours. During this time concrete pouring will grab. But it is worth remembering that waterproofing in private houses is not prerequisite. It all depends on the thickness of the sand layer. If it prevents the penetration of drops of moisture, then additional protection need not.
Expanded polystyrene should be used as insulation. This material answers everything technical requirements, but has high cost. As a substitute, and also for reasons of economy, you can use slag or expanded clay. The foam must be laid tightly, without gaps. The joints of the slabs should not coincide - they should be laid in a checkerboard pattern.

A layer of dense polyethylene is needed on top for waterproofing. This will increase performance polystyrene foam.
Pouring the solution
Before you start pouring the final layer, you need to install beacons. This will help create an even coating. The distance between the beacons is 50-60 cm. When installing, be sure to use a level. Now you can start pouring concrete. It's better to do this in portions. Leveling is done first with a shovel and trowel, and then with a rule. It is important to prevent the formation of depressions and tubercles.


This completes the creation of the concrete coating. After complete drying, you can begin the base coat. You can use any materials - wood, laminate, linoleum, ceramic tile.
Concrete floors can also be made warm. For this purpose, additional pipes are laid during the installation process.

Composition of the “pie”
All work is carried out in stages. Compliance with technology guarantees high-quality coating finishing. The most important thing when laying a concrete floor on the ground is to observe the composition of the “pie”.
A “pie” is the sequence of layers to cover. The construction of the floor on the ground will contain the following layers:
- The soil is compacted. It is very important to compact the soil well, otherwise your floor will sag and crack over time.
- A layer of sand or small crushed stone.
- Rough layer of concrete screed;
- Waterproofing;
- Insulation;
- Concrete floor.

To ensure that the concrete coating pleases you throughout its entire service life, It is worth considering the advice of experienced specialists:
- Layers of sand, crushed stone or expanded clay must be laid alternately. By carefully compacting each layer, you create a strong cushion for the concrete.
- It is advisable to pour concrete in one go. But if this doesn’t work out, then you can change the technology and do the filling in two approaches.
- If you want to get a high-quality and even coating after completing the work, then you should use a vibrator to compact the concrete floor, as well as for additional leveling.
- Do not immediately fill the entire floor with solution. It’s better to do everything gradually. Divide the area into several parts. Level the solution with a shovel, and only then use a rule and a needle roller.
At the end construction work related to the construction of a house, you need to take care of at least important stage- filling the floor. To ensure reliability, durability and warmth, use Decoration Materials: concrete and wood. Each has a number of disadvantages and advantages that need to be taken into account when laying the floor in a private house with your own hands, since pouring the floor is an important part in home improvement.
Tools and materials
Floor laying is carried out using necessary materials and tools, a set of which must be prepared in advance. You will need the following construction equipment:
- expanded clay;
- roofing felt used for waterproofing floors;
- limiting corners;
- trowels;
- shovels;
- polyethylene film, also used for waterproofing.
To make working with concrete easier, a vibrating rammer is used, which compacts the solution tightly and gives it porosity.
 When starting any construction work, even before it begins, you need to think through an action plan, calculate the shortcomings of the materials used, and only then proceed with installation. They begin working with the floors, determining their level, which will ensure further evenness.
After the calculations have been carried out, they begin to fill the floor. Lay out a layer of bulk materials, which will save concrete and make the floor even stronger. Initially, gravel is laid out approximately ten centimeters thick, after which it is compacted and filled with water. The top is covered with sand of the same thickness as a row of gravel. The final layer will be crushed stone, but it also needs to be sprinkled with sand and then compacted well. The surface of bulk materials must be smooth and free of gaps.
The next step when working with the floor is insulation, which is necessary to prevent various influences. Next, increase bearing capacity structures with materials with more durable properties and formwork is used. When preparatory work completed, you can start screeding.
Preparing the foundation
To ensure reliability floor base it is necessary to take into account the unevenness of the soil under the house; to do this, it is leveled and compacted to the required level in the floors. To ensure waterproofing, the surface is lubricated with clay and sprinkled with crushed stone and sand on top. After that, sheets of roofing felt or plastic film about a couple of centimeters thick are laid out. The connecting points are taped with a tape specially designed for this purpose.
Marking the level on the walls
Floors, or more precisely, their level, when the right process installations must correspond to door thresholds. Therefore, when marking the level, you need to navigate exactly according to them. Along the entire perimeter of the room using building level marks are made on the walls. For convenience, stretch the fishing line or mark the lines with a pencil. Next, mark the zero mark and begin work based on this point. To determine the center, a construction or laser level.
Preparation of concrete mixture
 To fill the floor, a concrete solution is prepared, which must be done immediately before the start of construction work, since it tends to harden, and in this form it becomes unusable. To prepare concrete you need: cement, crushed stone and... So that the concrete mixture is good quality, use sand with large particles, which does not contain clay additives or other organic substances. You should also pay attention to the consistency of the crushed stone, which should consist of crushed gravel and have small particles.
To prepare 50 liters of concrete solution, take 15 kg of cement, 50 kg of crushed stone and 35 kg of sand. Add water depending on the percentage of moisture in bulk materials. To obtain the solution of the desired consistency, dilute clean water Dry substances need to be added gradually and evenly, then the appearance of lumps will be avoided.
Compacting and leveling the soil
After construction work, a lot of debris remains, which must be removed before starting work with the soil. Before screeding the floor, remove cracks and uneven surfaces.
They begin working with the soil by removing the top layer and only after that they begin to compact the soil. The process continues until the surface is smooth and hard. If you don’t succeed in leveling and compacting it the first time, remove the top tier of soil and cover it with a dense material - sand.
 Begin backfilling the load-bearing base with gravel required thickness, while the material is distributed evenly over the area. The next step sand is being poured in about ten centimeters thick. Each layer is watered and compacted thoroughly. Finally, crushed stone is used and treated in the same way as with the lower tiers of the foundation. Stop compacting materials as soon as the surface acquires a smooth appearance.
We lay hydro- and thermal insulation
The use of waterproofing is an integral step in laying the base. With its help, the house is moisture resistant and increases its service life. For insulation in houses, polyethylene film is used, which is laid in several layers. The joints are connected with tape or adhesive tape. Next, a thermal insulation layer is applied, which will make the flooring of private houses warmer. Thermal insulation is done using mineral wool, polystyrene foam, expanded clay and polyurethane foam.
Reinforcement
In private houses, concrete floor reinforcement is used, which is necessary to increase the strength of the structure and resistance to heavy loads. For reinforcement, a special plastic mesh or a wire product. For convenient pouring, formwork is used, which is made from boards or plywood.
In this article we will analyze in detail the design and construction of a monolithic concrete floor on the ground. By “floor on the ground”, further in the article, we will mean a concrete floor made inside the contour of the foundation, directly on the ground. Let's consider FAQ associated with this floor, and the structure itself from the ground to the finishing surface.
For what types of foundations can a floor be made on the ground?
Concrete flooring can be used when strip foundation, and with a columnar foundation (or foundation using TISE technology). Slab foundation itself (by its design) is also a floor on the ground. With a strip foundation, the floor structure is usually adjacent to the foundation wall.
Rice. 1. Connection of the floor along the ground to the strip foundation

Rice. 2. Connection of the floor along the ground to columnar foundation with a low grillage
With a columnar foundation or a foundation using TISE technology, the floor structure along the ground can be adjacent to the grillage (if the grillage is low), or located below the grillage (if the grillage is high).
In the case of a high grillage, the gap between the floor structure and the grillage is closed when the floor is filled, for example, with boards (can be unedged). These boards remain in the structure and are not removed, Figure 3.

Rice. 3. Connection of the floor along the ground to the columnar foundation in the case of a high grillage
The height of the floor on the ground relative to the strip foundation

Rice. 4. Floor on the ground on the expansion of the belt

Rice. 5. The ground floor is adjacent to the wall of the strip foundation

Rice. 6. The ground floor is located above the foundation strip

Rice. 7. The ground floor is adjacent to the top of the tape
There are no constructive mandatory recommendations regarding the mark (height) of the floor installation on the ground. It can be installed at any height shown in Figures 4-7 above. The only thing you need to pay attention to when choosing this option is where the height of the front door will be. It is advisable to attach to the mark of the bottom of the door so that there is no difference between the bottom of the door and the floor, as in Figure 8, or so that you do not then need to cut an opening in the tape for the door.

Rice. 8. Height difference between the ground floor and the doorway

Rice. 9. The floor is level with the doorway
Note: Opening under front door it is better (more correct) to provide for it at the stage of filling the tape. Just do not fill this place, insert boards or foam plastic there, so that there is an opening in the tape. If you forgot to leave the opening, then you will have to either make the entire floor higher (and this will increase the cost of bedding), or cut an opening in the finished strip, cut the reinforcement in it, weaken it, etc.
Thus, if the opening under the front door is made correctly (at the stage of filling the tape), then we arrange the floor on the ground so that the top of the floor is level with the opening under the door (taking into account the finishing coating). In order to correctly calculate the thickness of the floor structure, and determine at what point you need to start its construction, you need to understand what the thickness of all its layers will be, what this depends on. More on this later.
There are no such cases. Even when high level groundwater, then it is more correct to install a monolithic floor on the ground than a floor on joists, for example. The type of soil, seismicity, level of freezing - all this also does not affect the possibility of installing such a floor.
Note: We do not consider situations where the house is raised above the ground on stilts; it is clear that then such a floor is not suitable.
Options for floor construction on the ground

Rice. 10. Floor construction on the ground with a ground water level higher than 2 m (with waterproofing)

Rice. 11. Floor construction on the ground at low ground water level, below 2 m, with bedding

Rice. 12. Floor construction on the ground at low ground level, below 2 m, without bedding, with pouring instead of rough screed

Rice. 13. Floor construction on the ground at low ground level, below 2 m, without bedding, with a rough screed
Rice. 14. Construction of the floor on the ground in combination with a warm floor
Note: Figure 14 shows the underfloor heating pipes and the reinforcing mesh above them. Between the floor pipes and the reinforcing mesh, - no gap, just drawn for clarity.
Description of the main floor layers based on the ground
Let's analyze the main layers (pie) of the floor according to the ground. Let's look at the structure from the bottom up. We will describe all the layers that may exist, without reference to a specific drawing.
- Compacted soil- the base for the floor must be well compacted;
- Bedding layers(sand 7-10 cm and crushed stone 7-10 cm). Bedding layers can be used to protect against capillary rise of water and can be used as a leveling layer. The crushed stone in the bedding layer should be of a fraction of 30-50 mm (large). The sand in the bedding layer can be of any kind, both river and quarry (gully). Whether the crushed stone can be replaced with expanded clay depends on the purpose for which the bedding is made; you can read about this in the paragraph Is it possible to replace crushed stone with expanded clay, in the same article, below. It is important that the bedding layers are well compacted. There are conditions when a bedding device is necessary and when it is not. You can read about this in the paragraph What determines the design of a floor on the ground, in the same article, below;
- Rough floor screed on the ground. This is a layer on top of bedding or compacted soil. Performed by plastic film(it spreads on the ground or bedding), the thickness of the rough screed is 5-7 cm. It does not need to be reinforced. Sometimes rough screed replaced by pouring. About pouring - in the next paragraph, about when you can replace the rough screed with pouring - in the paragraph Is it possible to replace the rough screed with pouring, in the same article, below. The crushed stone in the construction of the rough screed should be of a fraction of 5-10 mm (fine). The sand in the construction of the rough screed must be river sand, not quarry (gully);
- Pouring (pouring) the floor over the ground. It is arranged by pouring a solution onto the bedding layer. The thickness of the pouring is equal to the thickness of the bedding layer. It fits without plastic film;
- Waterproofing. Constructed from roofing felt, 1-2 layers. You can take the most ordinary roofing material, without sprinkling. There are conditions when waterproofing is mandatory. You can read about this in the paragraph What determines the design of the floor on the ground below;
- . As insulation for floors on the ground, we recommend using EPS with a density of 28-35 kg/m 3, or polystyrene foam with a density of 30 kg/m 3 and higher. The thickness of the insulation is determined by calculation (depending on the climate zone);
- Finishing screed. The thickness of the finishing screed is 7-10 cm. The crushed stone in the construction of the finishing screed should be of a fraction of 5-10 mm (fine). The sand in the construction of the finishing screed must be river sand, not quarry (gully). The finishing screed (as opposed to the rough screed) must be reinforced. Reinforcement is performed with a mesh with a wire diameter of 3-4 mm. How to choose, 3 mm or 4 mm, is written in the paragraph What determines the design of the floor on the ground below;
- Finish coating . The final finish of the floor on the ground can be anything. Accordingly, the details of the device are different for each type of coating.
Presence and sequence of floor layers on the ground
What determines the design of the floor on the ground:
- From the groundwater level;
- It depends on whether these floors will be with heat transfer fluids (warm) or not;
- From operational loads on floors.
How exactly the construction of a floor on the ground depends on these factors will be discussed below.
1. By the presence of waterproofing. Our recommendations: install waterproofing from roofing felt (1-2 layers) if the groundwater level lies closer than 2 m from the bottom of the floor along the ground. In addition, if the groundwater is located closer than 2 m, we recommend making a backfill of sand and crushed stone, Figure 10. If the level is lower than 2 m, then the floor can be made without waterproofing. At a level lower than 2 m, backfilling with sand and crushed stone is not necessary, Figure 11, 12, 13.
Note: You need to focus on the highest groundwater level that may be at a particular construction site. That is, look at how high the water rises in the spring, during a flood, etc., and take this level into account.
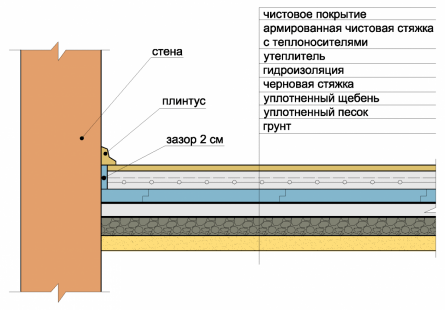
2. If there are coolants in the floor structure on the ground, you need to make a gap between the walls and the floor, 2 cm. This requirement is the same for both water and electric heated floors. The gap is made at the level of the finishing screed (with coolant). All layers below the finishing screed are placed against the walls without a gap, Figure 14. You can read more about the installation of a water-heated floor in the article.
3. If it is planned that something heavy will be placed on the floor on the ground (heavier than 200 kg/m2), then we reinforce the finishing screed with a mesh with a wire diameter of 4 mm. If the load is up to 200 kg/m2, then it can be reinforced with a wire mesh with a diameter of 3 mm.
Important points when installing a floor on the ground
These important points I would like to analyze based on the questions that, as a rule, arise among readers of our portal when installing a floor on the ground.
Can interior walls be placed on this floor?
Yes, you can install a screed reinforced with 4 mm wire interior walls made of brick (in brick), from a partition block (100 mm), and a wall half a block thick. By “block” we mean any block (expanded clay concrete, shell rock, aerated concrete, foam concrete, etc.)
Is it possible to replace crushed stone in the bedding layer with expanded clay?
Backfilling is usually done in order to interrupt the capillary rise of water. Expanded clay swells with water and is not suitable as a bedding material. That is, if the bedding was planned as additional protection from water, such a replacement cannot be made. If the backfill was not planned as protection, but simply as a leveling layer, and the water is far away (deeper than 2 m from the base), and the soil is constantly dry, then you can replace crushed stone with expanded clay to install a floor on the ground.
Is it possible to replace the crushed stone in the bedding layer with broken bricks and waste construction materials?
It is forbidden. If the bedding was planned as additional protection from water, then broken brick and other waste will not fulfill its purpose in the bedding. If the bedding was not planned as protection, but simply as a leveling layer, then we also do not recommend such a replacement, since these materials have different fractions and will be difficult to compact well, and this is important for normal operation floor designs.
Is it possible to replace the crushed stone in the bedding layer with expanded clay, pour more of it, and then not put insulation?
To replace 50-100 mm of EPS (this is the average amount needed to insulate a floor on the ground), you will need 700-1000 mm of expanded clay. It is impossible to properly compact such a layer, so we do not recommend doing this.
Is it possible not to reinforce the screed?
You don't have to reinforce the rough screed. The finishing screed must be reinforced.
Is it possible to reinforce the screed with something other than mesh? Instead of reinforcing mesh, is it possible to simply put metal rods in the screed without tying them together, or other metal parts?
No, for reinforcement to work, it must be done with a mesh.
Is it possible to lay waterproofing directly on bedding layers?
No, the waterproofing must be laid on a level and solid foundation(in our case this is a rough screed), otherwise it will quickly become unusable due to uneven loads.
Is it possible not to make a rough screed and put waterproofing or insulation (if there is no waterproofing) directly on the bedding layers?
We discussed waterproofing in the paragraph above. The insulation also needs to be laid on a flat and solid base. This base is the rough screed. Otherwise, the insulation may move, and subsequent layers too, and this may lead to cracks in the floor.
Is it possible to do a wash instead of a rough screed?
Let's look at what we mean by “rough screed” and “shedding”. A rough screed is a layer on top of bedding or compacted soil. It is carried out over a polyethylene film (it is spread on the ground or bedding), the thickness of the rough screed is 5-7 cm. The pouring is done by pouring the solution onto the bedding layer. The thickness of the pouring is equal to the thickness of the bedding layer. It fits without plastic film. Now let’s talk about whether the rough screed can be replaced by pouring. If the water is closer than 2 m, and the backfill (sand and crushed stone) was used as a layer that prevents capillary rise, then watering cannot be done. Because spilled crushed stone will not interrupt the capillary rise of water. If the backfill was carried out for leveling purposes, and the water is deeper than 2 m, then you can use a backfill instead of a rough screed. If there is no bedding at all, and the screed is done directly on the compacted soil, then you can do both a rough screed and a pour. It just turns out that there is no point in doing the pouring, since for it you will still have to pour about 3 cm of sand and about 10 cm of crushed stone, and in this case the sand is river sand, and the crushed stone fraction is about 10 mm. In general, it is easier to do a regular rough screed.
Does polyethylene under the rough screed replace waterproofing?
The function of this layer is to prevent concrete milk from going into the bedding layers or into the ground. This layer is purely technological; it does NOT replace the main waterproofing (roofing felt on top of the rough screed). If the water is deeper than 2 m, then waterproofing (roofing felt) is not needed, but this does not mean that we “replaced” it with polyethylene. It’s just that these layers have different functions and do not replace one another. When installing a rough screed and water deeper than 2 m, a layer of polyethylene is still needed.
Where is the correct place to place the reinforcing mesh in the finishing screed?
Does it matter where exactly the reinforcing mesh is located in the finishing screed layer (at the bottom, at the top or in the center)? If the screed is without coolants, then the mesh should be located 3 cm from the top of the screed (that is, approximately in the middle). If the screed contains coolants, then the mesh must be on top of the pipes, plus 2-3 cm of a protective layer.

Rice. 15. Finish screed without coolants, reinforcement

Rice. 16. Reinforcement of finishing screed with coolants
At self-construction country house or bathhouses on a strip foundation; in areas with a low groundwater level, it makes sense to make a concrete floor on the ground with your own hands . This technology is the fastest, most economical and allows you to do without the use of special equipment.
In addition, this floor design is more reliable and durable than ground floors without concrete, and does not require additional maintenance during operation.
Features of laying floors on the ground
In order to study this issue in detail, this article will consider the construction of a concrete floor on the ground in residential buildings with strip foundation.
In addition, the reader will be offered detailed instructions, which presents the technology of a concrete floor on the ground with step by step description implementation of all technological stages of construction.

Stage 1: preparatory work
It is recommended to begin work on the flooring after the walls of the building have been erected, window and door openings have been closed and the roof has been installed, and the average daily ambient temperature does not fall below +5°C.
Before pouring the concrete floor onto the ground, it is necessary to make a sand and gravel cushion:
- Clear the area of land within the boundaries of the foundation from construction waste and remove upper layer soil to a depth of 200-300 mm. Compact the surface of the earth using manual tamper or vibrating plates.
- Make markings along the internal perimeter of the walls of the building, outlining the zero mark of the subfloor. Using a hydraulic level, check that the zero mark is at the same height in all rooms.
- Fill the compacted soil with sand and gravel, which consists of a layer of gravel, 50 mm thick and a layer of sand, 100-150 mm thick.
- Moisten the surface of the pillow generously with water., tamp, then pour thin layer crushed stone with a particle fraction of 40-60 mm.
- Sprinkle crushed stone lightly with sand, then moisten with water and compact again.
Note!
When filling a sand and gravel cushion, it is necessary to control using a building level so that all layers of backfill are strictly parallel to the horizon.
Stage 2: pouring a monolithic slab
The next stage of construction is the production of a monolithic reinforced concrete slab, which will perform load-bearing functions and take on the entire main load on the floor. For this reason, it must be reinforced steel mesh, and its thickness should be at least 80-100 mm.
- Waterproofing. Place waterproofing made of thick polyethylene film on the sand and gravel cushion so that it extends onto the walls to a height of at least 500 mm.
- Reinforcement harness. On low spacers, lay a metal reinforcing mesh on the floor so that at the joints it has an overlap of at least 100 mm.
- Fill concrete. Prepare a concrete solution and distribute it evenly over the entire area of the room in a layer at least 80 mm thick.
- Alignment surfaces. Using a level, by measuring the distance to the finished floor marks, check that the poured surface is strictly horizontal.
After the mortar has set, the surface must be left for at least one week until the concrete has completely hardened. Diamond drilling of holes in concrete using special power tools.

Note!
All engineering Communication It is recommended to lay it before pouring the slab, however, if this has not been done in advance, it can be used laterA cutting reinforced concrete with diamond wheels after the monolith hardens.
Stage 3: insulation and waterproofing
The concrete floor, in contact with the ground, is a source of penetration of moisture and cold, therefore, to ensure a comfortable microclimate in the house, careful heating and waterproofing of the concrete floor along the ground is necessary.
Water-repellent materials and insulation are laid in several layers:
- Thick polyethylene film can be used as waterproofing, but it's best to cover the surface monolithic slab layer of liquid hot bitumen.
- Thermal insulation can be done in two ways: In the first case, a layer of blast furnace slag or expanded clay 100-200 mm thick is poured over the entire surface of the slab, but this material is hygroscopic and can absorb moisture.
- The second option is considered more acceptable and consists of laying slabs of extruded polystyrene foam (EPS) 50-100 mm thick on the floor.
- Expanded clay filling must be distributed in an even layer, and lay the EPS boards tightly, without gaps, on the floor and secure them with dowels and wide plastic washers.
- Another layer of waterproofing should be laid on top of the insulation. made of thick polyethylene film with a thickness of at least 200 microns, on top of which a reinforcing mesh is laid.

Note!
Pouringconcrete floor in the garage on the ground,You can do without thermal insulation, however high-quality waterproofing must be done in any case.
Stage 4: installation of concrete screed
The finishing screed serves to evenly distribute the load and lay the finishing flooring(ceramic tiles, linoleum, laminate), so it must have the same thickness and a smooth, uniform surface. The quality of this stage of work should be given Special attention, because the cost of rework, in case of technology violation, may be too high.
How to pour a concrete screed:
- Installation of beacons. Using cement or gypsum mortar, install beacon guide rails throughout the entire area of the room at a distance of at least 1 meter from each other, defining the upper level of the subfloor level.
- Pouring the solution. Starting from the far corner of the room, fill each section of the floor, evenly distributing the cement-sand mortar over the entire surface of the filled area.
- Leveling the surface. To do this you need to use a metal or wooden rule, moving it with vibrating movements along the guide beacons.
- Floor screed. Thus, moving from one area to another, it is necessary to fill the entire room, which is recommended to be completed in one working day.
- Grouting cracks. After the mortar has set, it is necessary to remove the beacon guides and fill the resulting cracks with fresh cement-sand mortar.
Upon completion of this operation, the room must be left for several days until it completely hardens and dries. cement mortar. After 2-3 weeks, the floor surface must be primed. For this purpose it is best to use epoxy or polyurethane primer for concrete that must be applied using a roller.
- In paragraph 1 the manufacturing recipe is indicated cement-sand mortar for finishing screed.
- Clause 2 specifies the recipe for making concrete mortar for pouring a monolithic slab.
Conclusion
After reading this article, it becomes clear that self-production concrete floor in country house Almost any home craftsman can do it.
To obtain Additional information on this issue, you can watch the video in this article or read similar materials on our website. I am ready to answer all your questions in the comments.