We will send the material to you by e-mail
T It’s hard to imagine a well-kept garden without garden paths going around flower beds and gazebos. Originally designed, they not only perform a utilitarian function, but are also part of the landscape. The coating can be very diverse, the main thing is that it is not difficult to care for, and it is durable enough to last for decades. The task of any summer resident is to make garden paths with your own hands at low cost, but with optimal results.
A garden path can be made from regular boards
When choosing the style of the path, you need to take into account the overall design of the residential complex. Garden paths can be classified according to the material used:
- Gravel. The simple construction and attractive appearance of this coating hide significant disadvantages. Such coverings are difficult to clear from leaves and snow; they will not tolerate the arrival of equipment.
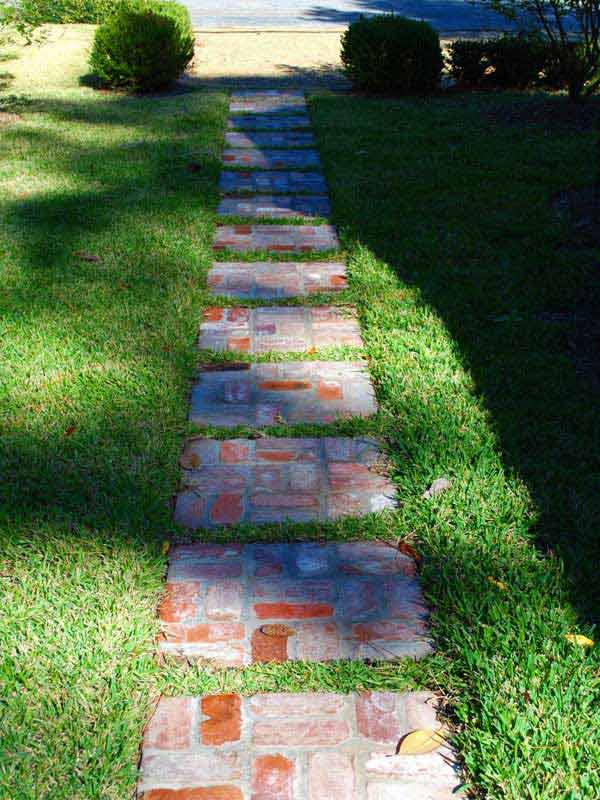
- Brick. This coating is not expensive, it can be laid without any special skills. If you use clinker material rather than simple solid brick, the path will last a very long time.

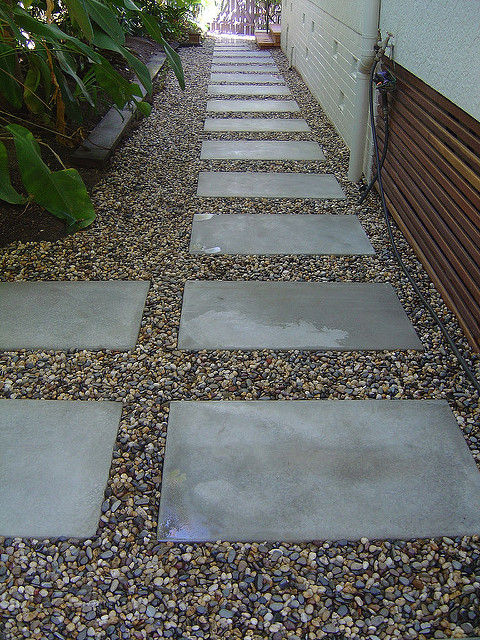
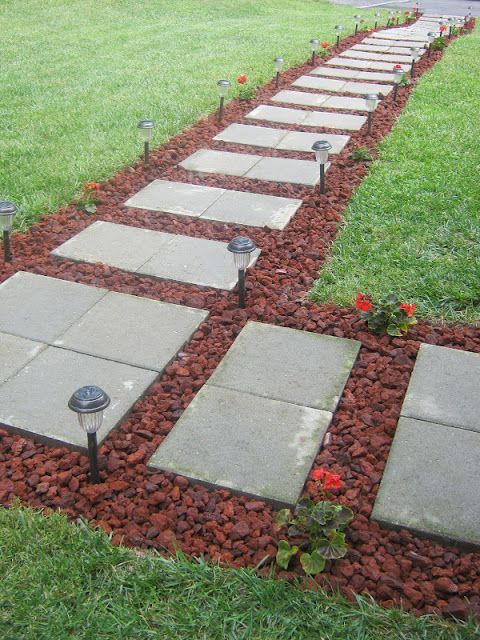
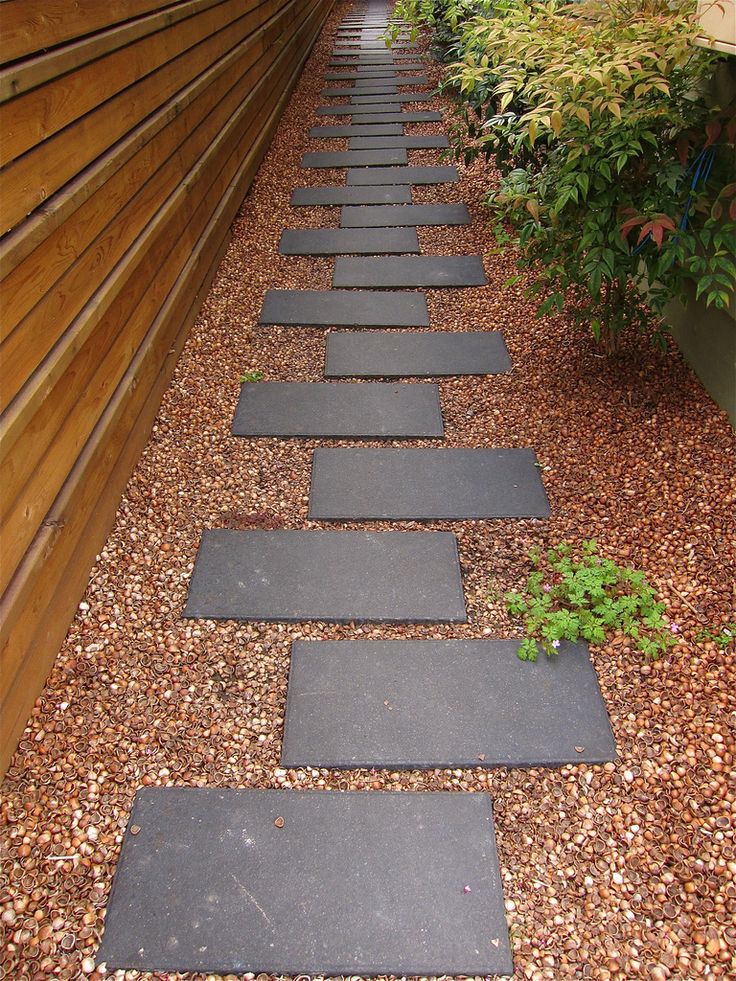
- Concrete. Making a concrete path at your dacha with your own hands is not as difficult as it seems. Materials for work are affordable. If you tint the concrete and use curly shapes, you can achieve excellent results.

- Wooden. Paths made from cuts of tree trunks look very original. If wood is treated properly, it will not decompose for a long time.

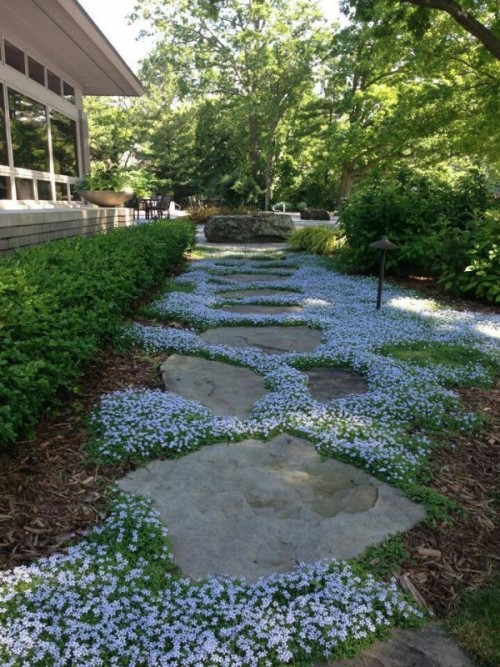
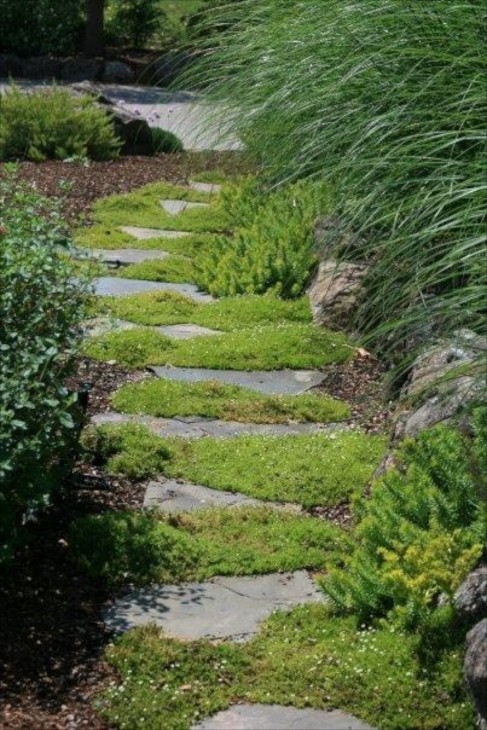
- Herbaceous. Green paths require careful maintenance. They need to be trimmed regularly, watered during droughts and replanted. But they fit perfectly into any country landscape.

- Ground. This option is only suitable for temporary use. In wet weather, dirt will stick to your shoes and they may become overgrown with weeds.

Related article:
Molds for making garden paths from concrete
One of the most affordable options is paths created using a mold for making garden paths. Such a coating can withstand a significant load, for example, the passage of a tractor. Plastic molds you can buy them in the store average cost- about 900 rubles. Working with them does not require special skills.

Before you start pouring, you need to remove upper layer soil about ten centimeters and prepare a sand and gravel bed. Afterwards the mold is set and poured concrete composition. After 10-15 minutes, the form is removed and moved to another location. Such a sidewalk can be used for its intended purpose in just five days. IN cement composition You can add dyes.
Important! Concrete should be poured onto a damp base and, after pouring, be moistened during the hardening period to prevent cracking.
You can make a form for concreting yourself from boards or iron. After the mortar has formed, sand is poured into the spaces between the tiles.

Paths made of sand and crushed stone
Garden paths You can make it yourself at low cost from crushed stone, gravel or special colored backfill. Such sidewalks, in addition to other functions, will also serve as burglar alarm, you won’t be able to walk through them silently.
Helpful information! Gravel paths can only be laid on flat areas; on slopes and depressions the gravel will roll down and accumulate.

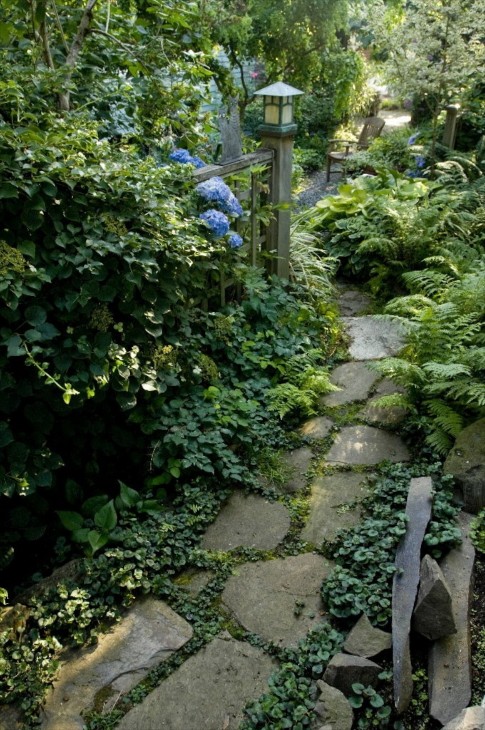
Backfill coatings do not tolerate smooth geometric lines. They should be curvy and curly. The top layer of soil is selected along the contour of the future path. Geotextiles need to be laid at the bottom of the trench; it will prevent the material from “going” into the ground. The edges are secured with border tape or laid out with pebbles. Large flat stones can be placed among the gravel.

DIY brick paths: photos of masonry options
Often, after construction or repair work, simple brick remains on a suburban site, which can become an excellent material for paving. To work, you will need a shovel, a building level, a rubber hammer, hand compaction, sand and cement. As with any other coating, it is better to remove the top layer of soil by about fifteen centimeters. A bed of gravel and sand is laid on top of the geotextile. Next photos do-it-yourself brick paths show different variants drawing:


Having decided on the design, first install the borders. Their role can be played by the same bricks placed on edge or ready-made elements. Then onto a flat surface (this needs to be checked building level) bricks are installed. There should be a small distance between them, which will later be filled with sand. When installing, the bricks are lightly knocked together and leveled using a rubber hammer.
Wood and other materials
A colorful and unusual version of garden paths is made from wood cuts. Hardwoods are particularly durable. Oak, acacia, and beech cuts are the best choice.

The tree trunk is cleared of bark and cut into nickels 10–15 centimeters thick. Each element must be treated with drying oil. If you don’t have it at hand, you can use regular mining. After the cuts have dried, you can begin installation. The foundation is being prepared traditional way, using geotextiles and sand-gravel mixture. Geotextiles will allow moisture to pass through, but will not allow weeds to grow through the coating.

The saw cuts are placed on a pillow. This work requires a certain diligence: each element differs in size and shape, you need to select them so that there are as few empty spaces as possible. Small spaces are filled with cuts of thick branches. You can use small pebbles and pebbles for voids. After some time, the tree on the path will darken, this is a natural process.
Helpful advice! To make it possible to walk along the path barefoot, it is better to sand the top side of the cuts.
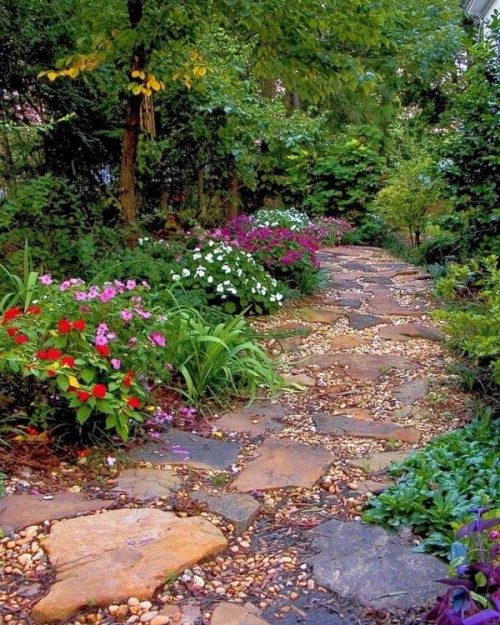
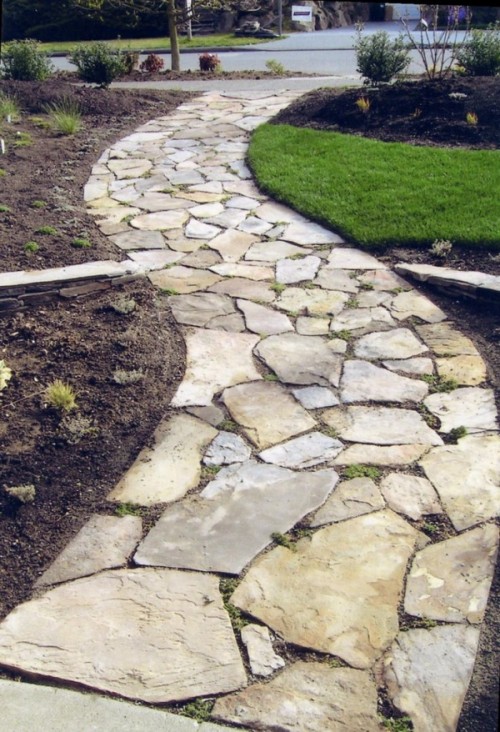
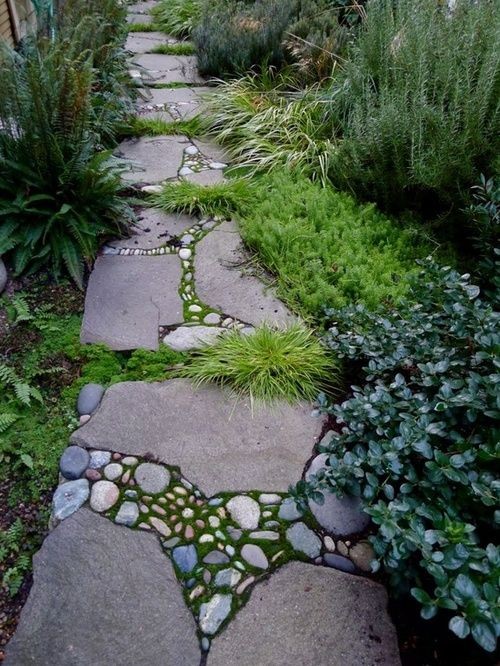
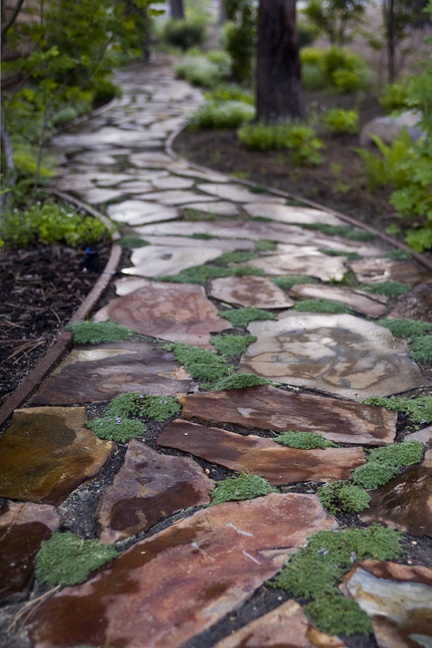
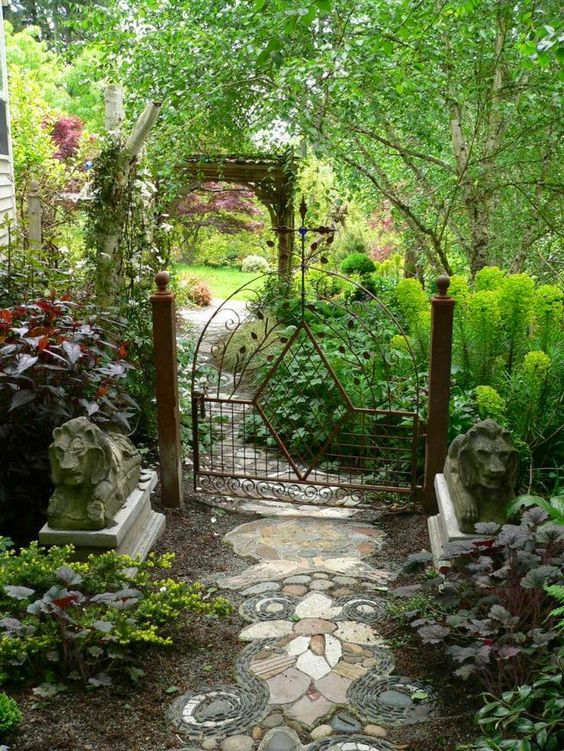
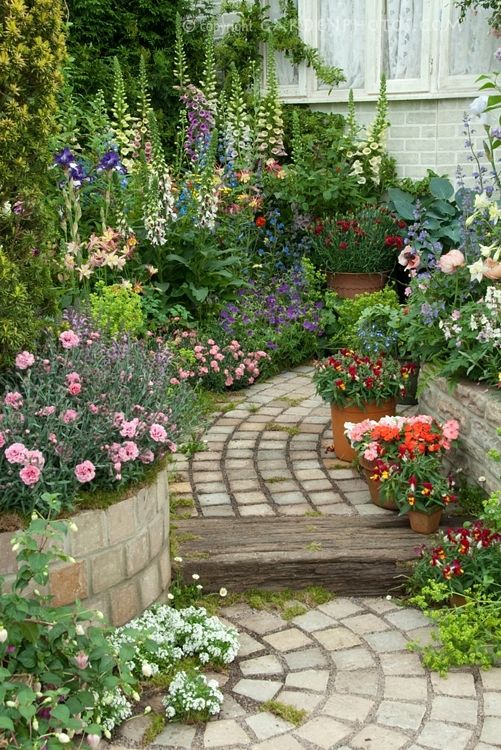
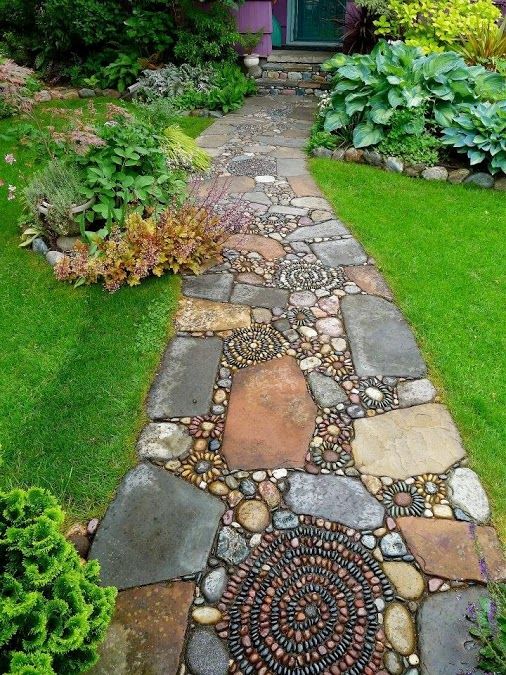
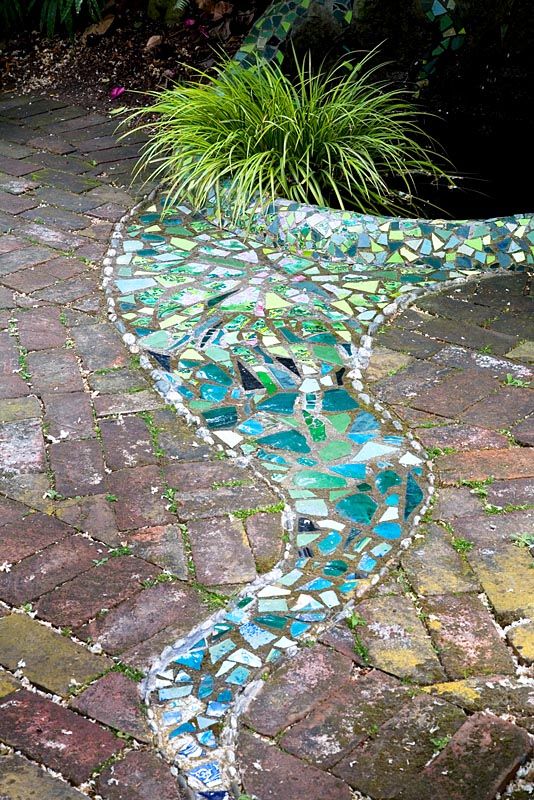
Paths made of natural stone will be a logical continuation of the alpine landscape. Large flat stones different sizes and the colors are stacked together with the small ones. Particularly chic are paths made of colored pebbles laid in patterns. This garden path will require a lot of time and patience, but the result is worth it. The stones are laid on cement mortar. Such coatings are practically eternal, do not fade and do not need to be maintained. DIY garden paths, photos of pebble paths:


Do-it-yourself garden paths can be easily and quickly made from ready-made plastic modules at low cost. They are sold in garden stores and are relatively inexpensive. The elements can be put away for the winter and washed if necessary.

Article
In addition to functionality, paths in the country play a huge role in original design landscape. The presence of beautiful original paths adds sophistication to the site and creates a positive impression of its owners.
Sometimes it is difficult to decide on the material for garden alleys in order to fully preserve perfect harmony plot without going beyond the available budget.

It is important that the material chosen for arranging the paths is in harmony with the style of the garden. So after compiling estimate documentation, as well as calculating the required dimensions, you can begin to select the most optimal material.

Natural stone
At the moment, natural stone is still considered one of the status and practical materials for various coatings.

Marble, sandstone, and granite are used. Based on the preferences of the owners of the site, a stone in a light or dark shade is selected. Stone alleys have a variety of shapes, but require professionalism when laying them.


Stone that is laid in plates is incredibly in demand. It's called flagstone. Identical and affordable option is considered to be an imitation of natural stone, which is offered on the market in a wide range of products.

The stone alleys look great, harmonizing with the trees and shrubs growing on the site. Natural stone goes well with pebbles.

Among the advantages of stone are durability of use, a high degree of resistance to mechanical influences, aesthetics, and a variety of textures and configurations. The disadvantages include quite high price, slippery when the surface is wet and covered with a crust of ice in cold weather.


Paving stones
Garden paths made of paving stones are in demand due to their durability, high stability to temperature changes.

A varied palette of shades and a variety of configurations make paving slabs universal material, used in a wide variety of design ideas.

The paving stones are easy to install and fit perfectly into any shaped garden space. By production type Paving stones are available in several types, so they can be sawn or chipped.

The advantages include versatility of use. Among the disadvantages is that laying at an unprofessional level can cause distortions.


Brick
Clinker brick is often used as a covering for garden paths, as it is convenient during installation, fits well into an area of any style, and is available in a variety of shades.

It is important to note that we are talking about clinker, since building bricks are not suitable for creating garden alleys.


Alleys made of wood
This type of garden path can hardly be called practical, however, additional impregnation and treatment can increase their resistance to negative influence mold, humidity.

To maximize the performance characteristics of the coating, it is advisable to use it exclusively on dry hills.

To the most suitable tree species oak is used for organizing alleys; the rest of the array also has positive characteristics.


Inexpensive price category The options are wood cuts, as well as bars, and a more expensive option is deck boards.

Among the advantages of wooden alleys are their originality and affordability. Disadvantages include impracticality and instability to mechanical influences.

Concrete alley
Poured concrete alleys have become widespread in suburban areas. This coating considered a barrier to weed and has increased resistance to the negative effects of moisture.

Forms for such alleys are sold in any specialized store. With this type of device, concrete becomes a true design find. Using dyes, colored parts are obtained, the shapes provide a specific pattern.

The advantages of concrete paths include practicality and durability, as well as external originality, while the disadvantages include the labor-intensive nature of the work process.


Choose the most suitable material and arrange beautiful and stylish alleys on your site!

Photos of paths on a summer cottage

Provides for the creation of paths. Moreover, the requirements for them are quite serious: they must be reliable, comfortable, functional, beautiful and, very preferably, inexpensive. We’ll talk about how to make garden paths with your own hands at low cost in this article.
What to make paths from
The path surface can be hard or loose. To create a hard coating use following materials:
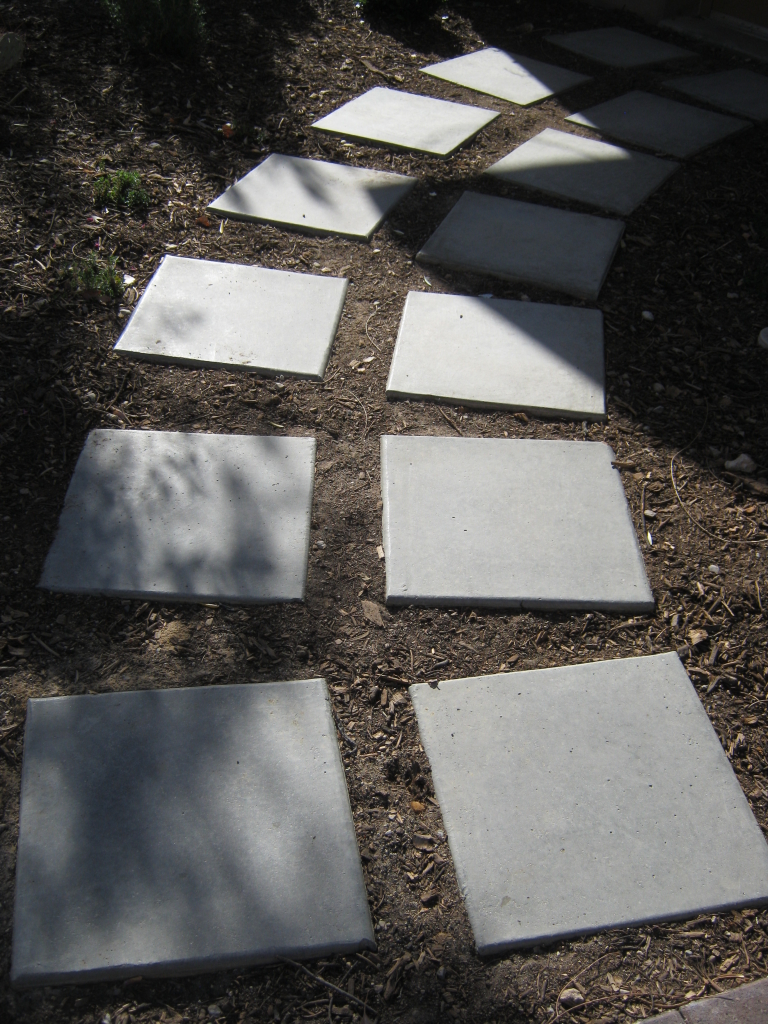
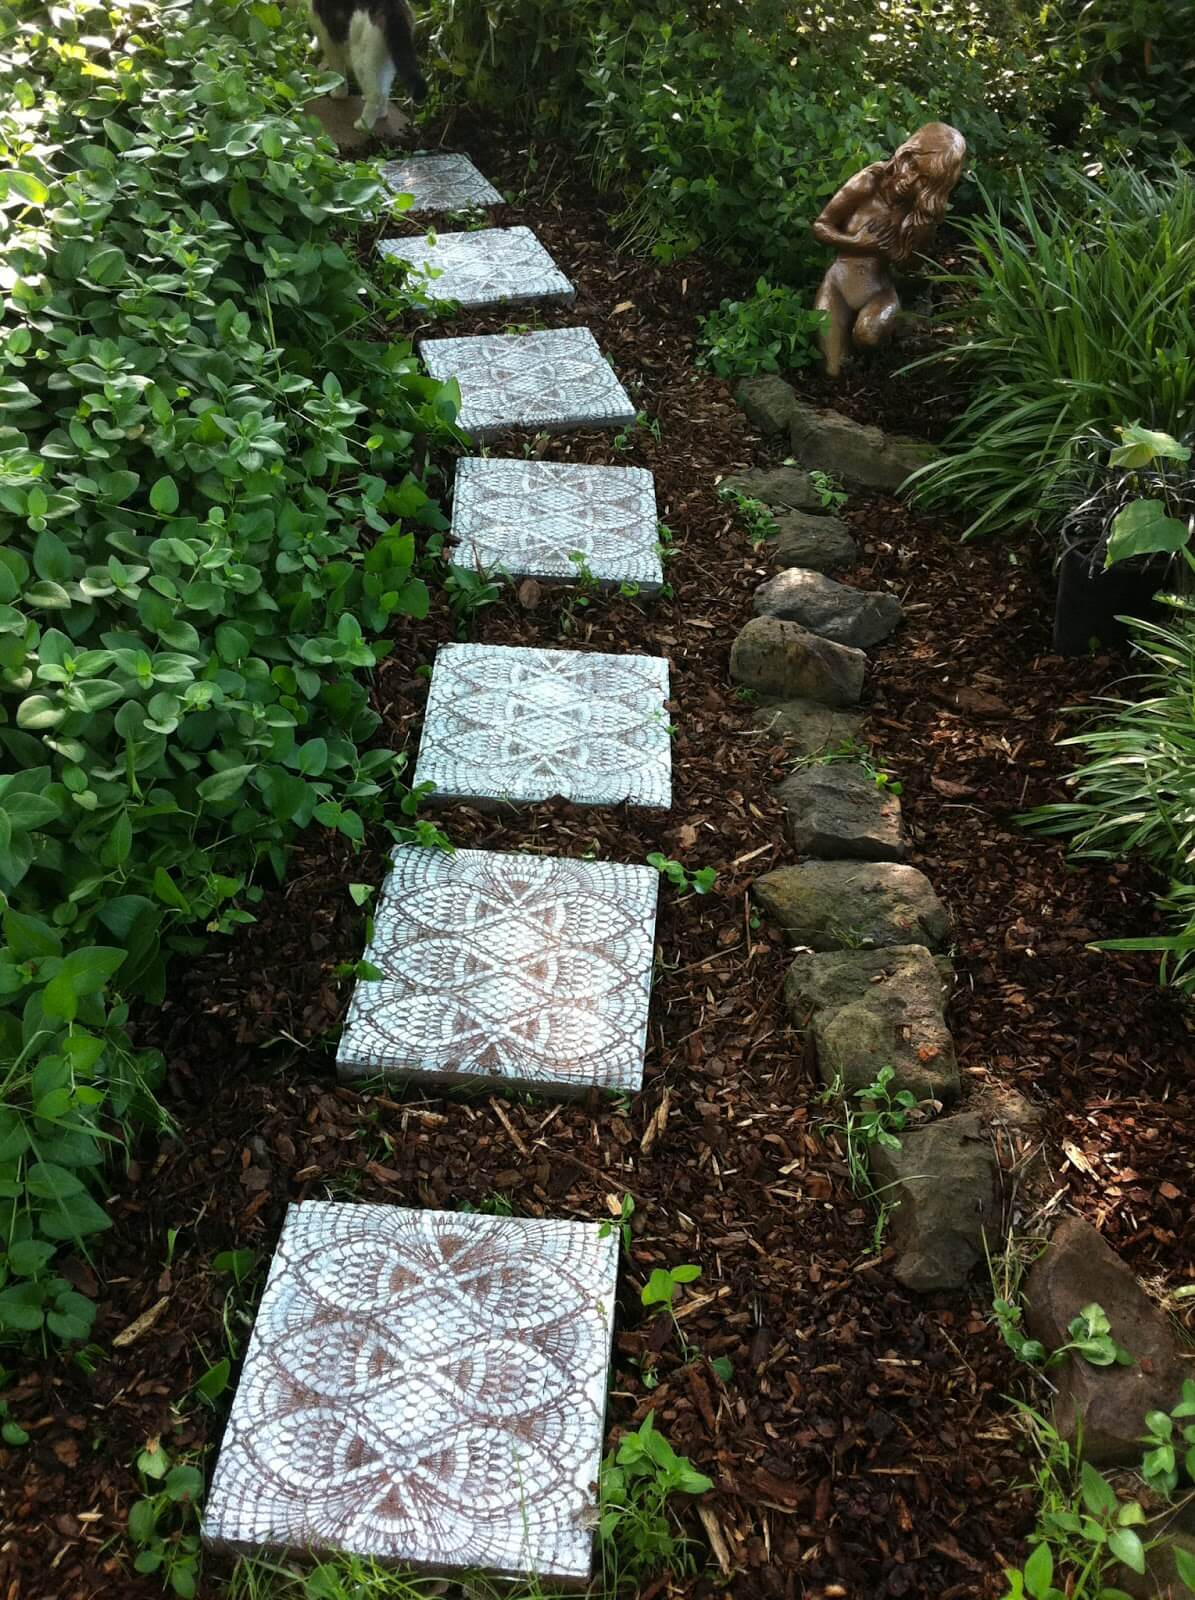
- Concrete. Concrete walkways are more than just plain gray tape. In addition, there are dyes and you can decorate it if desired. There are also forms for filling immediately on site. It turns out homemade paving slabs. Another option is to pour small ones yourself. concrete plates the right size, then put them on the bedding. See photos for design examples.
And everyone in the household has forms for such a path - cut water bottles into cylinders, place them as needed and fill them with solution: beautiful and cheap
 And this is a concrete path with expansion joints. If you look closely, you can see that there are stripes across it. This is in order to wet surface was non-slip
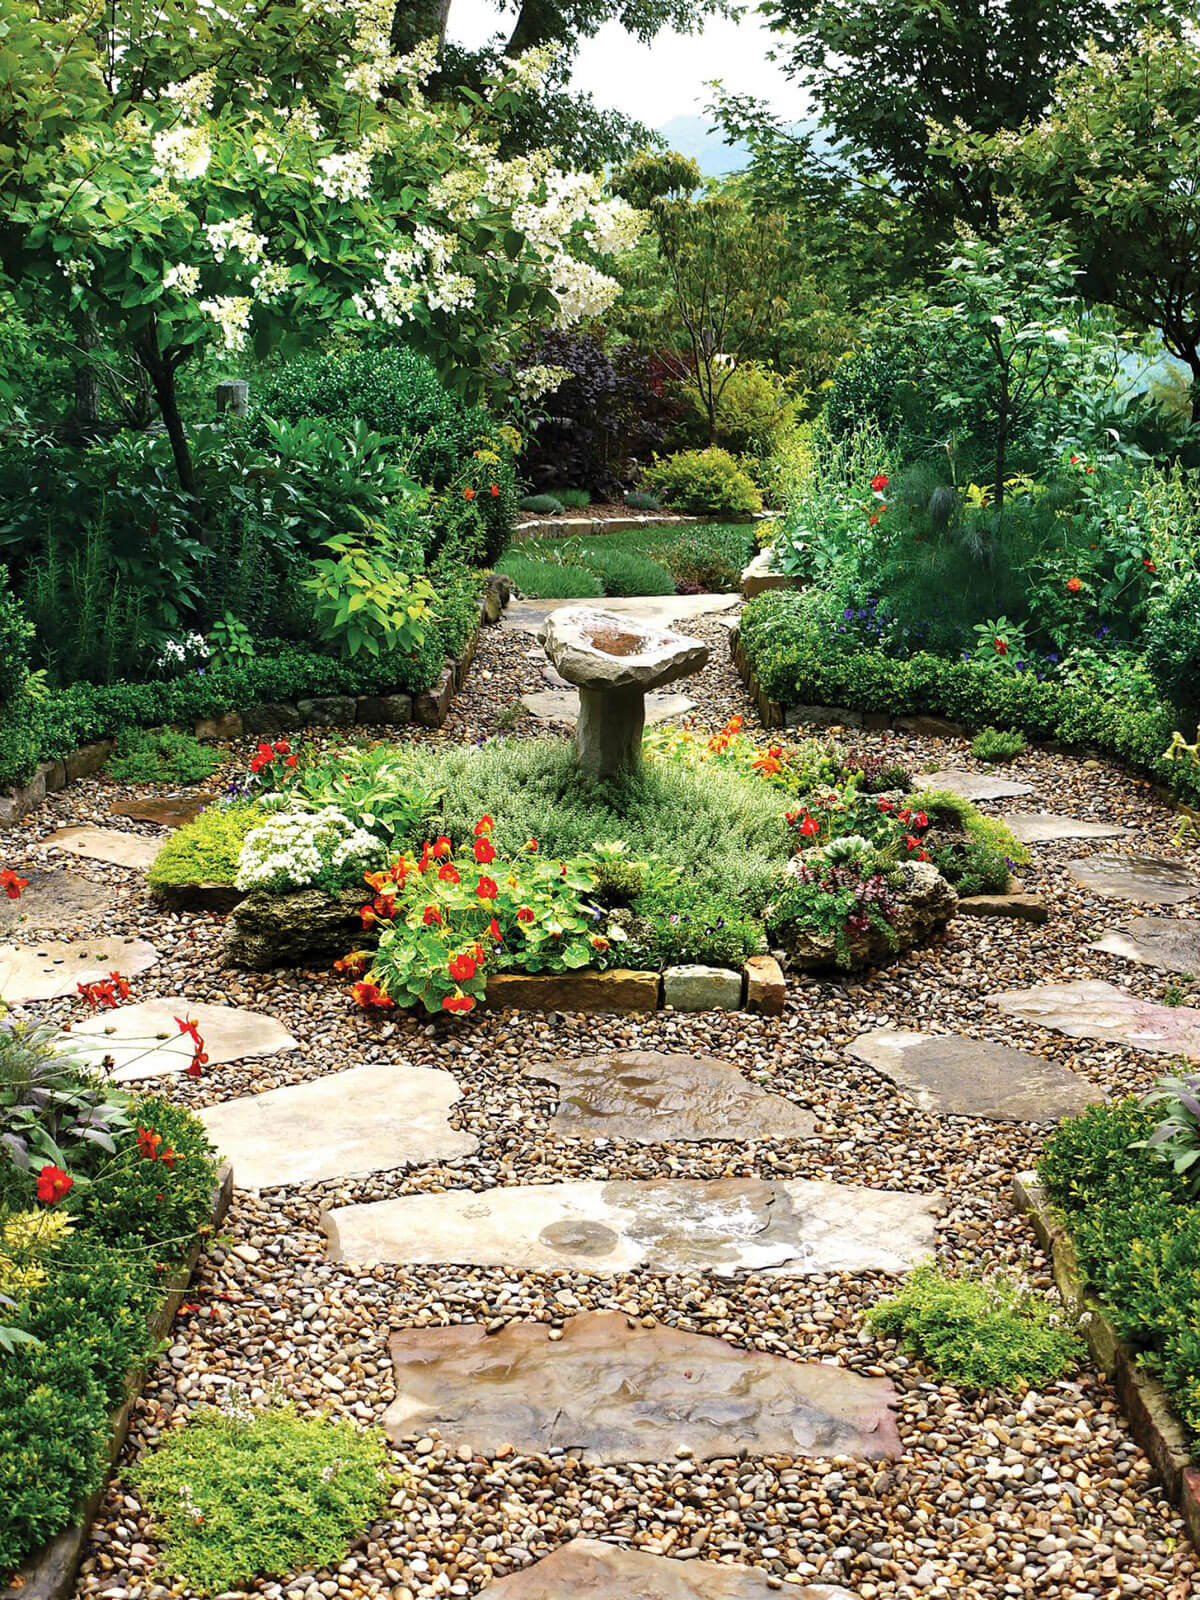
 - Flagstone. This a natural stone, which was cut into plates. It is laid on a prepared base (more on this later), the gaps are filled with backfill. It turns out beautiful, reliable, non-slip. It’s not for nothing that landscape designers love flagstone paths so much.
 Backfill is one of the important elements that shapes the appearance
 - Brick. Ordinary ceramic brick — beautiful material, but not for paths. It absorbs moisture, and if it then freezes wet, it breaks into pieces. If you are planning to make a path from broken bricks, then you can walk on it more or less normally only for a couple of years. Then you'll have to redo it. The resulting cracks will need to be filled with coarse sand or fine crushed stone. Clinker bricks will last much longer on the path, but this option cannot be called low-cost: the cost of one piece starts from several tens of rubles.
These are two types of bricks - ceramic and crushed granite. A clinker brick path is beautiful, to say the least... but maybe too beautiful for a garden?
- Tree. Such a seemingly unsuitable material, but correct processing it can serve for a long time. Moreover, many hand-made wooden paths can be classified as low-cost. For example, they came up with the idea of using stumps and tree cuts as borders or coverings. They also make flooring from well-treated boards - better than a terrace, but if not, an old floor will do.
The combination with pebbles is comfortable to walk on. And this is how to make a path from boards
- Plastic. There are tiles for garden paths made of plastic - polyethylene or polypropylene. She has square shape and a system of locks that are attached to one another. It can be laid directly on top of the lawn or previously trodden paths in the country house or on a plot of land. This is an option - fast and cheap. It can definitely be called “Low Cost”. It is better, of course, to make the filling according to the rules from crushed stone and sand, and lay plastic elements on top. It's a little longer and more expensive. There is also an immodest, but very beautiful option plastic tiles for paths. There is also “garden parquet”. These are slabs or boards made of wood-polymer composite - WPC (they are in the photo, they look exactly like parquet). This material appeared relatively recently. It looks and feels like wood, but is essentially a mixture of wood flour and polymer. These are very beautiful coatings, but their cost is by no means modest. Although not fabulous.
This is garden parquet. Gorgeous, but overpriced
- Pebbles. These are rounded natural stones that can be found on the banks of rivers or lakes. Flatter stones are more suitable for making paths. There are different shades of gray, black, white, and sometimes you can find burgundy. These stones, laid close to each other, create amazingly beautiful mosaic paths. But this is an activity for the diligent and persistent. Those who lack patience can find large flat boulders or large pebbles and place them in the sand. It's not as luxurious, but no less reliable. You can do the same with granite or other similar stones. It is important that at least one edge is relatively flat. You put this flat part up, and bury the rest. The work is not easy, but you can not only walk on the path, but also drive.
- Available materials. Country paths are made from old tires and bottles.
There are also paved paths: gravel or crushed stone. Their peculiarity is that with a small layer of 2-3 cm and sufficient compaction, it is comfortable to walk on them. If the layer is slightly larger, unevenness will form when walking, and such walking will be tiring. Therefore, as you have seen in many photographs, gravel and crushed stone are used as backfill, into which rigid elements made of other materials are laid. When done correctly, this is convenient: gravel conducts water well and puddles do not form. For those who don't like it grey colour, we can advise painting it: many designers do this when organizing rockeries.

How to make garden paths with your own hands
It’s not enough to know what you can make garden paths from with your own hands. You also need to know how to make them correctly so that it lasts for more than one season or two. Laying different materials may differ slightly, but there are several rules and actions that are repeated in any technology.
First rule: When laying or shaping the path surface, it is made with a slight slope. If the material allows, a slope of several centimeters is made on both sides of the center. If, for example, it is flooded concrete path, then the slope is formed in one direction - away from the house, if it is nearby. The slope is made towards the lower part of the site if the path is located on a slope.

Second rule: Any coating requires preparation of the base. If you place stones (for example) directly in clay or loam, there will, of course, be benefits - it will definitely be more convenient to walk, but the stones will “silt up” after some time. They will simply trample into clay. When installing a bedding, this will take much more time. And if you add a drainage cushion and a side, water drainage will be even more effective, and everything will look even more beautiful.

Third rule: the level of the path surface should be a couple of centimeters higher than the adjacent area. Then the water will drain quickly, cleaning will be more convenient, and cleaning will be required less often: the eroded soil will not flow either during rains or during watering, which is often done along the paths.
Step-by-step instruction
When making garden paths with your own hands, start with markings. In theory, the dimensions and shape should be marked on your site plan, and the markings should be carried out according to the project. But most often everything is done locally. To make the future path more visible, its contours can first be covered with white sand or something similar. If the shape suits you, you can drive in pegs and stretch twine between them, but you can also work on the backfill.

You can place a flower garden or flower bed along a beautiful path. Read how to make them.
Beautiful DIY pebble path
If with flagstone, paving stones, brick, everything is more or less clear - everyone has already seen more than once how this is done, then how to lay pebbles in patterns is not clear.

Below is a photo report on the process of making a pebble path. It shows the basic techniques: lines are drawn onto leveled sand along which pebbles will be laid out. If these are arcs, they are made using thread and two sticks/nails.

When selecting stones, they are laid out on edge close to each other, slightly buried in the sand.

Place a board on the folded pattern and take rubber mallet and they knock on the board, hammering pebbles into the sand. This is how they deepen the entire pattern, making sure that the edges of the pebbles are at the same height.

Stones are sunk into the sand
Take a mixture of sand and cement (2 parts sand, 1 part cement) and fill the gaps, leveling the layer with a brush.

A fragment of a pebble path is carefully watered with water so that the backfill does not wash away. Wait several hours for the cement to set a little, then remove the excess with a soft brush.

It is important not to miss the moment: the solution should not get dirty, but also become a stone. If you pick at it with your finger, it should crumble. It's time to clean off the excess.
Path made of wooden stumps and crushed stone: video
Old logs or trees can be turned into beautiful path. The wood is cut into logs of the required length, the face cut is sanded, and all the wood is first treated with a bioprotection compound (you can soak it in waste oil). After drying, dip into Kuzbass varnish and dry again. Then coated with paint desired color the front parts of the stumps - which will protrude outward. They dry it again and only then put it in the sand.
The process is described in detail in the video. Here we explain step by step how to make garden paths from stumps or logs with your own hands.
Making a concrete path yourself
The process is generally similar to that described at the beginning. There are some differences that we'll talk about.
After the trench is dug and the bottom is leveled, formwork is installed along it on both sides. These are boards from 25 mm thick (thicker is possible, thinner is not advisable, you can use plywood 16-18 mm thick). Their height is the height of the track. If you are shaping the slope, the boards should be aligned taking it into account - one side is slightly higher, the other is slightly lower.

The formwork is leveled - the concrete will be leveled against it
To make formwork, pegs are driven into the ground at intervals of no more than 60 cm. Boards are nailed to them. It is better to smear the inner surface of the formwork with mining or other oil: so that it can be removed easily. Next, crushed stone is poured onto the bottom and compacted. But compaction must be done carefully: if you walk along the bottom, no traces should be visible.
Next, to prevent the path from cracking, a metal reinforcing mesh is laid on the crushed stone. The thickness of the rod is 4-6 mm, pitch is 5-10 cm. It is sold in pieces, they need to be tied together with steel wire.

Then, to compensate for the expansion in winter period you need to put wooden planks 1.5-2 cm thick. They are placed across the path, set so that the height of the planks is level with the formwork boards. Compensation strips are installed at least every 2 meters. More often it is possible, less often it is not. Why do it more often? For beauty. Squares look better than long rectangles.
IN finished frame is poured concrete mortar grades not lower than M-250 (). For it, take 1 part cement, 3 parts sand, 4 parts crushed stone. Everything is mixed into a solution of medium fluidity (thick sour cream) and poured into the formwork. When pouring, you need to be careful not to leave air bubbles. To remove them, pierce the solution with a pin, shaking it slightly - bayonet it. It is ideal if you have a surface vibrator for concrete - it quickly compacts the solution, creating a perfectly flat surface. If it is not there, you will have to level it using the rule, using the edges of the formwork as beacons.

A few hours later, after the concrete has set, you can treat the surface. You can leave it as is, you can brush it with a stiff brush, making transverse stripes, and finally, you can lay pebbles, stones, flagstone, etc. into the not completely hardened solution. It's not very economical, but it's reliable. After a couple of days, the formwork can be removed, and you can already walk along the path.
Budget track made from tires
They make a lot of things out of tires: swings, and... walkways. It's simple: old tire you need to cut off the sides, leaving only the tread. How can I cut it? Bulgarian. Someone manages to use a knife, but this is only if the cord is not metal.

The projector is cut crosswise to create a track. Then cuts of 15 centimeters are made on the sides - depending on the diameter of the tire. They will give you the opportunity to unroll the tires.

They make cuts on the curved edges - the surface is still nonlinear
In this form it can already be laid on the beds. It will serve for many years. This one is definitely a low cost garden path.

This coating will withstand many years of active use.
As you understand, there are a lot of options on how to make garden paths with your own hands. It is impossible to tell and describe everything, but we are trying...
Garden paths at the dacha, personal plot or in the courtyard of a private household - this is not only important element landscape design, necessary for comfortable movement between objects of the territory, but also a method of zoning and decoration. Correct location garden paths will allow you to spend as little time and effort as possible moving between elements of landscape design, and a beautiful, practical and durable design will allow you to decorate your yard or summer cottage, create a creative design that will be the envy of your neighbors and the pride of guests of your urban or country home with a local area. Even in a small private courtyard, paths are necessary for safe and comfortable movement between the main and secondary objects of the territory - the building of a country or city house, a garage, a gazebo, outbuildings, children's corner or playground, swing, barbecue area, swimming pool or pond.
Requirements for garden paths
If we talk about physical parameters, then the main requirement for the paths of the local area and garden plot, is the smallest distance from one object to another. But often this criterion runs counter to the aesthetics of landscape design - winding paths look beautiful, romantic and even mysterious, but at the same time they make up a longer path than their counterparts with clear straight lines and turns.


Conventionally, all the paths of the site are divided into main and secondary. The requirement for the width of the path also depends on the functionality of the path - the main ones are usually made with parameters of 1-1.5 m, and the secondary ones can have a width of at least half a meter. But a lot depends on the material used to make the garden path - if standard-sized pieces are used (bricks, concrete or stone slabs, “garden parquet” or any other products with non-variable sizes), then the width of the path is determined by their number.


If we talk about the aesthetic qualities of garden paths, then they must externally correspond to the general design concept of the yard or site. If natural stone is used in the design of the façade of a house or other buildings, cladding areas and patios, then it would be logical to use this material or its combination with other raw materials for laying out paths.


In addition to its main function - providing the opportunity to move freely between objects in the local area and dividing the site into segments, or otherwise - zoning, garden paths also play the role of decorative elements. By using original choice material or method of execution of country paths, you can not only create an exclusive landscape design for your site, but also bring to life your Creative skills, design ideas.

Types of garden paths
According to the type of material used, all tracks can be divided into the following groups:
- concrete;
- stone (in turn divided into those made of flat stone, pebbles, paving stones and other types);
- brick;
- wooden;
- from waste material (plastic lids, parts glass bottles, traffic jams, etc.).


The material for the paths is selected based on the design of the main building (its facade), other large-scale buildings in the yard or on the site, the style of execution, the size of the paths themselves and the capabilities of the owners (a stone path will require financial investments, and a path made of bottle caps will only require time to collect them ).

In addition to the material, the criterion for dividing the tracks is the method of execution - they are divided into solid and non-solid. The name speaks for itself. The type of paths will depend on their length and purpose - whether the paths play an exclusively practical role or also carry a decorative function.

Also, all country and garden paths can be divided into two types - temporary and permanent. Most of the paths involved in landscape design are permanent. But in some cases there is a need to lay paths, for example, only during the summer season. Ready-made tracks are most often made of rubber or plastic and are sold by the meter or in blocks (sections, products) connected to each other like puzzles.


Preparatory work
Regardless of how long your tracks will be, what material they will be made of and in what manner, any execution will require preparatory work. First of all, you need to draw up a plan for the location of the paths on the site. This can be done either on a regular sheet of paper or in a special program, which is not difficult to find on the Internet. Indicate on your plan all the elements of landscape design - not only the main buildings and sites, but also the location of flower beds, beds, and utility objects.


While laying the still drawn paths from the main objects to the secondary ones, you can optimize the location of flower beds, beds and temporary plantings, in order to reduce the distance between objects or connect some elements into zones. As you draw up the plan, it will become clear which segments can be united by a path leading to them, and for which areas of the yard you will have to use branches or pave areas. Only on paper it may seem that a rarely visited corner of the garden or yard can do without a path - imagine your reluctance to walk on the ground after rain, and you will find the resources to make even a very narrow path.

Next comes the markings on the ground. This stage should not be neglected, especially in cases where not only the length, but also the width of the paths will be clearly regulated by the parameters of the material - slabs, bricks or any other standard blanks. The easiest way to mark is using pegs with a stretched rope or cord. To make the outlines of future paths more obvious, the boundaries can be outlined with lime.

The ideal option can be obtained if, together with marking the paths, it is possible to place marks for planting trees and shrubs, plants that will frame these same paths. On the ground, everything looks a little different than in the program or on a piece of paper. You can lay out stones with inscriptions of the names of trees and shrubs or use them to indicate the layout of future flower beds.


The foundation pit for any path should be slightly wider than the path itself. In order for garden paths to last as long as possible, it is necessary to lay a border of stones or concrete along the edges.


Base for garden path
You should not neglect this stage of work if you want the path you have laid to last long years, and did not begin to crumble or sprouted grass after the first season of operation. When preparing the foundation for garden dredges, it is important to remember that they should have a slight slope to drain rainwater. The presence of a small drainage trench on the side of the slope of the paths will be an excellent help for the entire landscape design of the yard or area during rainy weather.


So, it is necessary to carry out the following manipulations to prepare the base for the garden path:
- remove the top fertile layer from 2 to 20 cm (it all depends on the quality of the soil, length, tires and material for laying out the paths);
- along the entire length of the walls of the resulting pit are installed wooden boards, after adding a little sand underneath;
- if the width of the path is limited by concrete curbs, then they are leveled and fixed with reinforcing bars (to prevent shifts), which are driven inside the pit;
- if the soil on your site is very loose and the walls of the trench are uneven, you will have to drive reinforcing pins along the edges of the walls, and then install curbs;
- then fine gravel or crushed stone, previously mixed with cement or sand, is poured onto the bottom of the trench, leveled and compacted (layer thickness from 5 to 10 cm);
- For more thorough compaction of the gravel layer, it is necessary to wet it periodically.


An example of designing a beautiful and practical garden path
Let's consider the option of arranging garden paths made of brick, as the most affordable and easy-to-use material (if you have the opportunity to use used bricks rather than buy the material).


A brick garden path is a fairly durable, strong and aesthetic surface that even a homeowner without special skills and experience can make on their own. Brick path laid out on the same principle as paving slabs or paving stones. In order for the trail to last as long as possible, choose high-quality clinker bricks and carry out all work with high level accuracy.

So, you need to go through the following algorithm of actions:
- the prepared base with a compacted top layer of sand must be carefully leveled using the rule ( homemade device from a board with a perfectly equal surface);
- Next comes the installation of side bricks (in relation to the width of the path), they are mounted edgewise and driven into the sand half their width using a rubber hammer;
- if your path does not have a border, then the side bricks must be fastened with mortar (use formwork, after removing which you need to add crushed stone and compact it at the end of this part of the work);
- Next, the brick path pattern is directly laid out (it can be placed edgewise or laid wide);
- Usually, to create the most rigid and durable masonry, one row of bricks is laid along the path, and the second - across. Also, to increase the strength of the masonry, use street glue on cement based(it will help not only to hold the bricks together, but also to prevent grass from growing through the products).
- You will need a little solution, because... it is necessary that it does not protrude to the surface between the bricks, but is located inside the masonry;
- upon completion of the installation of bricks, the gaps between them are filled with sand using a large brush;
- in order to add brightness to the resulting brickwork and to extend its service life, the surface must be coated with a penetrating primer, and after it has completely dried, with a varnish for street stones.


And finally: some original ideas
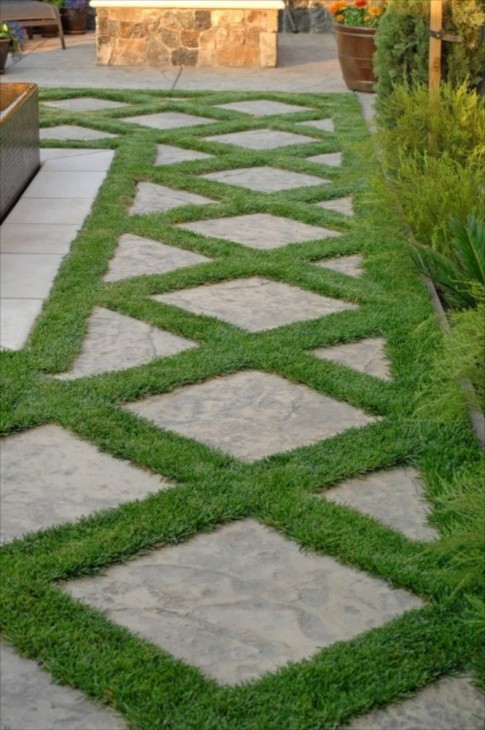
In modern landscape design projects for the most different forms and sizes, design styles, you can often find garden paths laid out in the style of stepping stones. It is as if you are moving along the elements of the path in the form of individual slabs, flat stones or cuts of logs that arise directly from the lawn or bulk material trail basics. Beautiful, modern and at the same time functional track It’s easy to do it yourself if you use so-called “steps” made of concrete of various shapes.


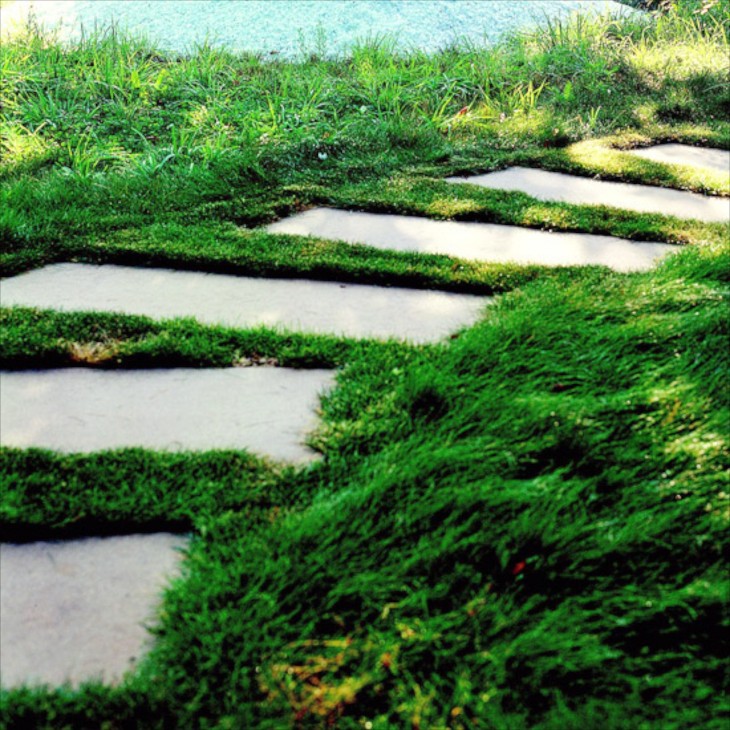
In this case, the combination of materials looks original. For example, clear edges and sharp corners of concrete square or rectangular slabs or flat stone against the background of rounded shapes of river stone - pebbles. Together, these two types of materials provide an organic and attractive alliance for creating creative, yet practical surfaces.


And “steps” made of wooden slabs look luxurious on fine decorative gravel in snow-white shades. Against the backdrop of bright green lawns, such paths will look especially impressive...

Wooden garden paths are not that uncommon. Only in Lately For modern projects landscape design is increasingly using the so-called “garden parquet”. The material is standard sizes blanks that are very easy to connect to each other to create not only a durable and wear-resistant, but also incredibly beautiful coating. “Garden parquet” is used not only to create paths, but is also laid out on open verandas, platforms, terraces and patio or barbecue areas. The wood in such products is processed in a special way - it is not affected by the usual “natural irritants” - moisture, temperature changes, direct sunlight.


Laying out designs from round river stones (mostly Altai blue) allows you to create complex original tracks, but bring the beauty of the creative process into the design of your yard or summer cottage. Round river stones of various sizes from very light gray-blue to dark like anthracite can be laid out in fancy abstract patterns or prints with quite clear geometric patterns. Creating such a path will require not only financial, but also time, incredible accuracy and large quantity free time. But all efforts will be more than compensated by the incredible aesthetics of the paths and their uniqueness.


An effect no less original can be achieved by laying out a pattern from the remains of porcelain tiles (products for flooring, street use). The advantage of this method is not only the originality of the result and the freedom of your imagination, but also the saving of the family budget, because not only leftovers are used, but fragments from tiles of different shapes, sizes and colors.


A path created exclusively using loose gravel may not surprise your guests or neighbors, but it will help save the family budget. It is only important to install strong, solid borders that will hold small fractions of stone inside the trench.


Paths at the dacha connect all objects on the site: house, gate, summer kitchen, barn, gazebo, greenhouse, bathhouse, vegetable garden, shower. There is no way to do without them. In one area they can be made of various materials, have all sorts of configurations, but must necessarily fit into general form space. At your dacha, you can make paths with your own hands by first drawing up a plan.
Paths at the dacha connect all objects on the site: house, gate, summer kitchen, barn, gazebo, greenhouse, bathhouse, vegetable garden, shower
Designers recommend creating curved areas in small areas - this visually increases the area. Trees should not grow near paths, as their roots can damage the integrity of the surface. After drawing a diagram, estimate on the ground how convenient it will be to move from one object to another along the planned paths, so that later you don’t have the desire to redo everything. It's complicated. Paths even made from scrap materials, but well designed, give the area a neat, complete and cozy look.
First you need to decide on the coating. Most often it is made from paving slabs, concrete, stone, brick, wood, and pebbles. General requirement for all materials - strength, moisture and frost resistance. The surface should be non-slippery and easy to clean. To mark and prepare the soil for laying, the following materials and tools are needed:
- pegs, cord;
- boards;
- shovel;
- sand, crushed stone;
- rammer;
- level;
- screwdriver
Determine the boundaries of the path by adding allowance to the formwork. Its width depends on the purpose. Usually, from the gate to the house it is made wide and continuous, but, for example, near the dog enclosure it can be narrow and intermittent. Pegs are placed along the marked edges and the string is pulled. Using a shovel, remove the turf to a depth of 10 cm, and level the bottom of the resulting trench. Straight lines of paths are limited by boards at the same level, securing them with stakes from the outside. The boards are screwed one to another using a screwdriver. Sand is poured into the trench and compacted. Its depth and height of the pillow depend on the selected covering material and technological features styling The coating can be hard or soft.

Hard tracks
Hard coatings include: paving slabs, concrete, clinker bricks, stone, wood.
Paving slabs are the most common option for paths on the site. The market offers many types, sizes, shapes and colors. There are plenty to choose from, including reasonable prices. Depending on the location, it can be laid on sand, crushed stone or mortar. In this case, it is necessary to follow the rule: the paths must be paved with a slight slope so that water flows from them freely.
The tiles are placed tightly, their position is leveled with a level and a rubber hammer, and sand is added if necessary. The quality of installation is controlled wooden block: If the tile is raised, it is planted by tapping on the block. It is correct to start laying from the curb. Having finished the work, the seams are covered with a mixture of sand and cement and watered. In order for the path to maintain its shape, it is limited by curbs, installing them on a liquid solution.
If it is intended to lay tiles on concrete, then after a cushion of sand and crushed stone is made, across the path at a distance of 1 m along the entire length, they are installed on the edge of the board to provide a compensation gap for temperature changes. They are leveled along the formwork, which should protrude 2-3 cm above ground level. To prevent concrete from sticking, the boards are treated with machine oil or drying oil.
To make smooth turns, the formwork is made from wet plywood; it can be bent in any way you like. The constructed frame is poured with concrete: cement (M500), sand, crushed stone in a ratio of 1:4:6, add as much water as the mixture will take. To obtain a more plastic solution, a special plasticizer is used, you can use liquid soap. It is best to make the mass in a concrete mixer.

This is the most common option for paths on the site
A monolithic concrete path is inexpensive. It looks decorative if you add dye to the top layer and decorate it like a stone. The first layer of crushed stone is poured onto a prepared base 4 cm thick and a mesh with cells up to 20 cm is laid. When the solution hardens, a 3 cm layer of concrete without crushed stone with a small amount of water is applied on top of it, compacting it thoroughly. The surface is leveled and smoothed.
To decorate it like a stone, you can use bent reinforcement, applying a pattern to your taste. Usually along the edges of the path a pattern is made that imitates a small stone. To give the surface a characteristic porosity, you can treat it in places with a sponge. Until the concrete is fully matured, it must be protected from both sun and rain. The slower it matures, the stronger the coating.
Gallery: paths in the country (25 photos + video)


Forms for garden paths
You can make paths from decorative concrete by purchasing a special dry mixture and a plastic or silicone mold with a pattern in the store. Choose it with grooves that are small in depth and width, as dirt quickly accumulates in large gaps and the path loses its decorative effect. The shape pattern can consist of rhombuses, squares, fan-shaped rectangles, and all kinds of interlacing. Country paths made of decorative concrete look very stylish and cost no more than laid ones paving slabs. The work is performed in the following sequence:
- prepare the base as described above and cover it with a 10 cm layer of crushed stone;
- poured cement mortar and smooth;
- sprinkle with dry powder dye of the desired shade;
- stamp the surface with forms, laying them close to each other and lightly compacting them;
- after 3 days, wash the path with a brush dipped in a solution of hydrochloric acid;
- cover acrylic varnish, which protects against negative impact and gives great attractiveness.

You can make paths from decorative concrete by purchasing a special dry mixture and a plastic or silicone mold with a pattern in the store.
Instead of a dye, you can use a hardener, which, in addition to the pigment that gives color, contains quartz sand. You can begin pressing when the concrete mixture does not stretch when your finger is applied to it.
Stone and wood
For wooden paths, larch is mainly used as the most moisture-resistant material. Solid decking is installed on piles of blocks 10-20 cm high terrace board with a pattern so that it is not slippery. The soil is leveled only under the blocks, placed on cushions of sand and gravel, isolating them from the ground and timber with roofing felt. First, they lay out the boards completely over the entire area of the path and only then attach them.
Despite the fact that wood is inferior in strength to stone and concrete and rots, tree cuts are used to create paths in a country house in a rustic style. Often logs left over from dismantling old buildings are used for this purpose.
The trunk is divided into stumps 15-40 cm thick, the top layer is sanded, the bark is removed and the part that will be underground is treated with an antifungal agent, after which it is laid on the prepared surface and leveled.
Paths can be built from stone. They look very harmonious. It is not recommended to use shell rock and limestone, as they are short-lived and also slippery. Most often they are laid on sand. Making such a path will be slow, since each stone should be inspected, choosing the smoothest side, which will be on the outside. Often they have to be filed down. Having laid 2-3 m, the made section is fixed by filling the cracks between the stones liquid solution cement and sand (1:3). It’s convenient to do this by using a kind of cone made from an empty bag with a corner cut off. Slabs for stone paths must be at least 4 cm thick.

For wooden paths, larch is mainly used, since it is the most moisture-resistant material
Original new material for coverings - decking, or garden parquet. It consists of small sections made from planks of hardwood trees. Garden parquet is laid on supports that are selected in height so as to smooth out differences in ground level. The basis for decking can be a sand and gravel cushion, concrete covering with drain or wooden joists. The water underneath should not stagnate. It is installed quickly and easily. At the end of the season, it is disassembled, washed, lubricated with special oil and stored in a dry room.